

Payment gateways connect Spark CRM to payment processors, enabling you to accept credit card payments from your customers.
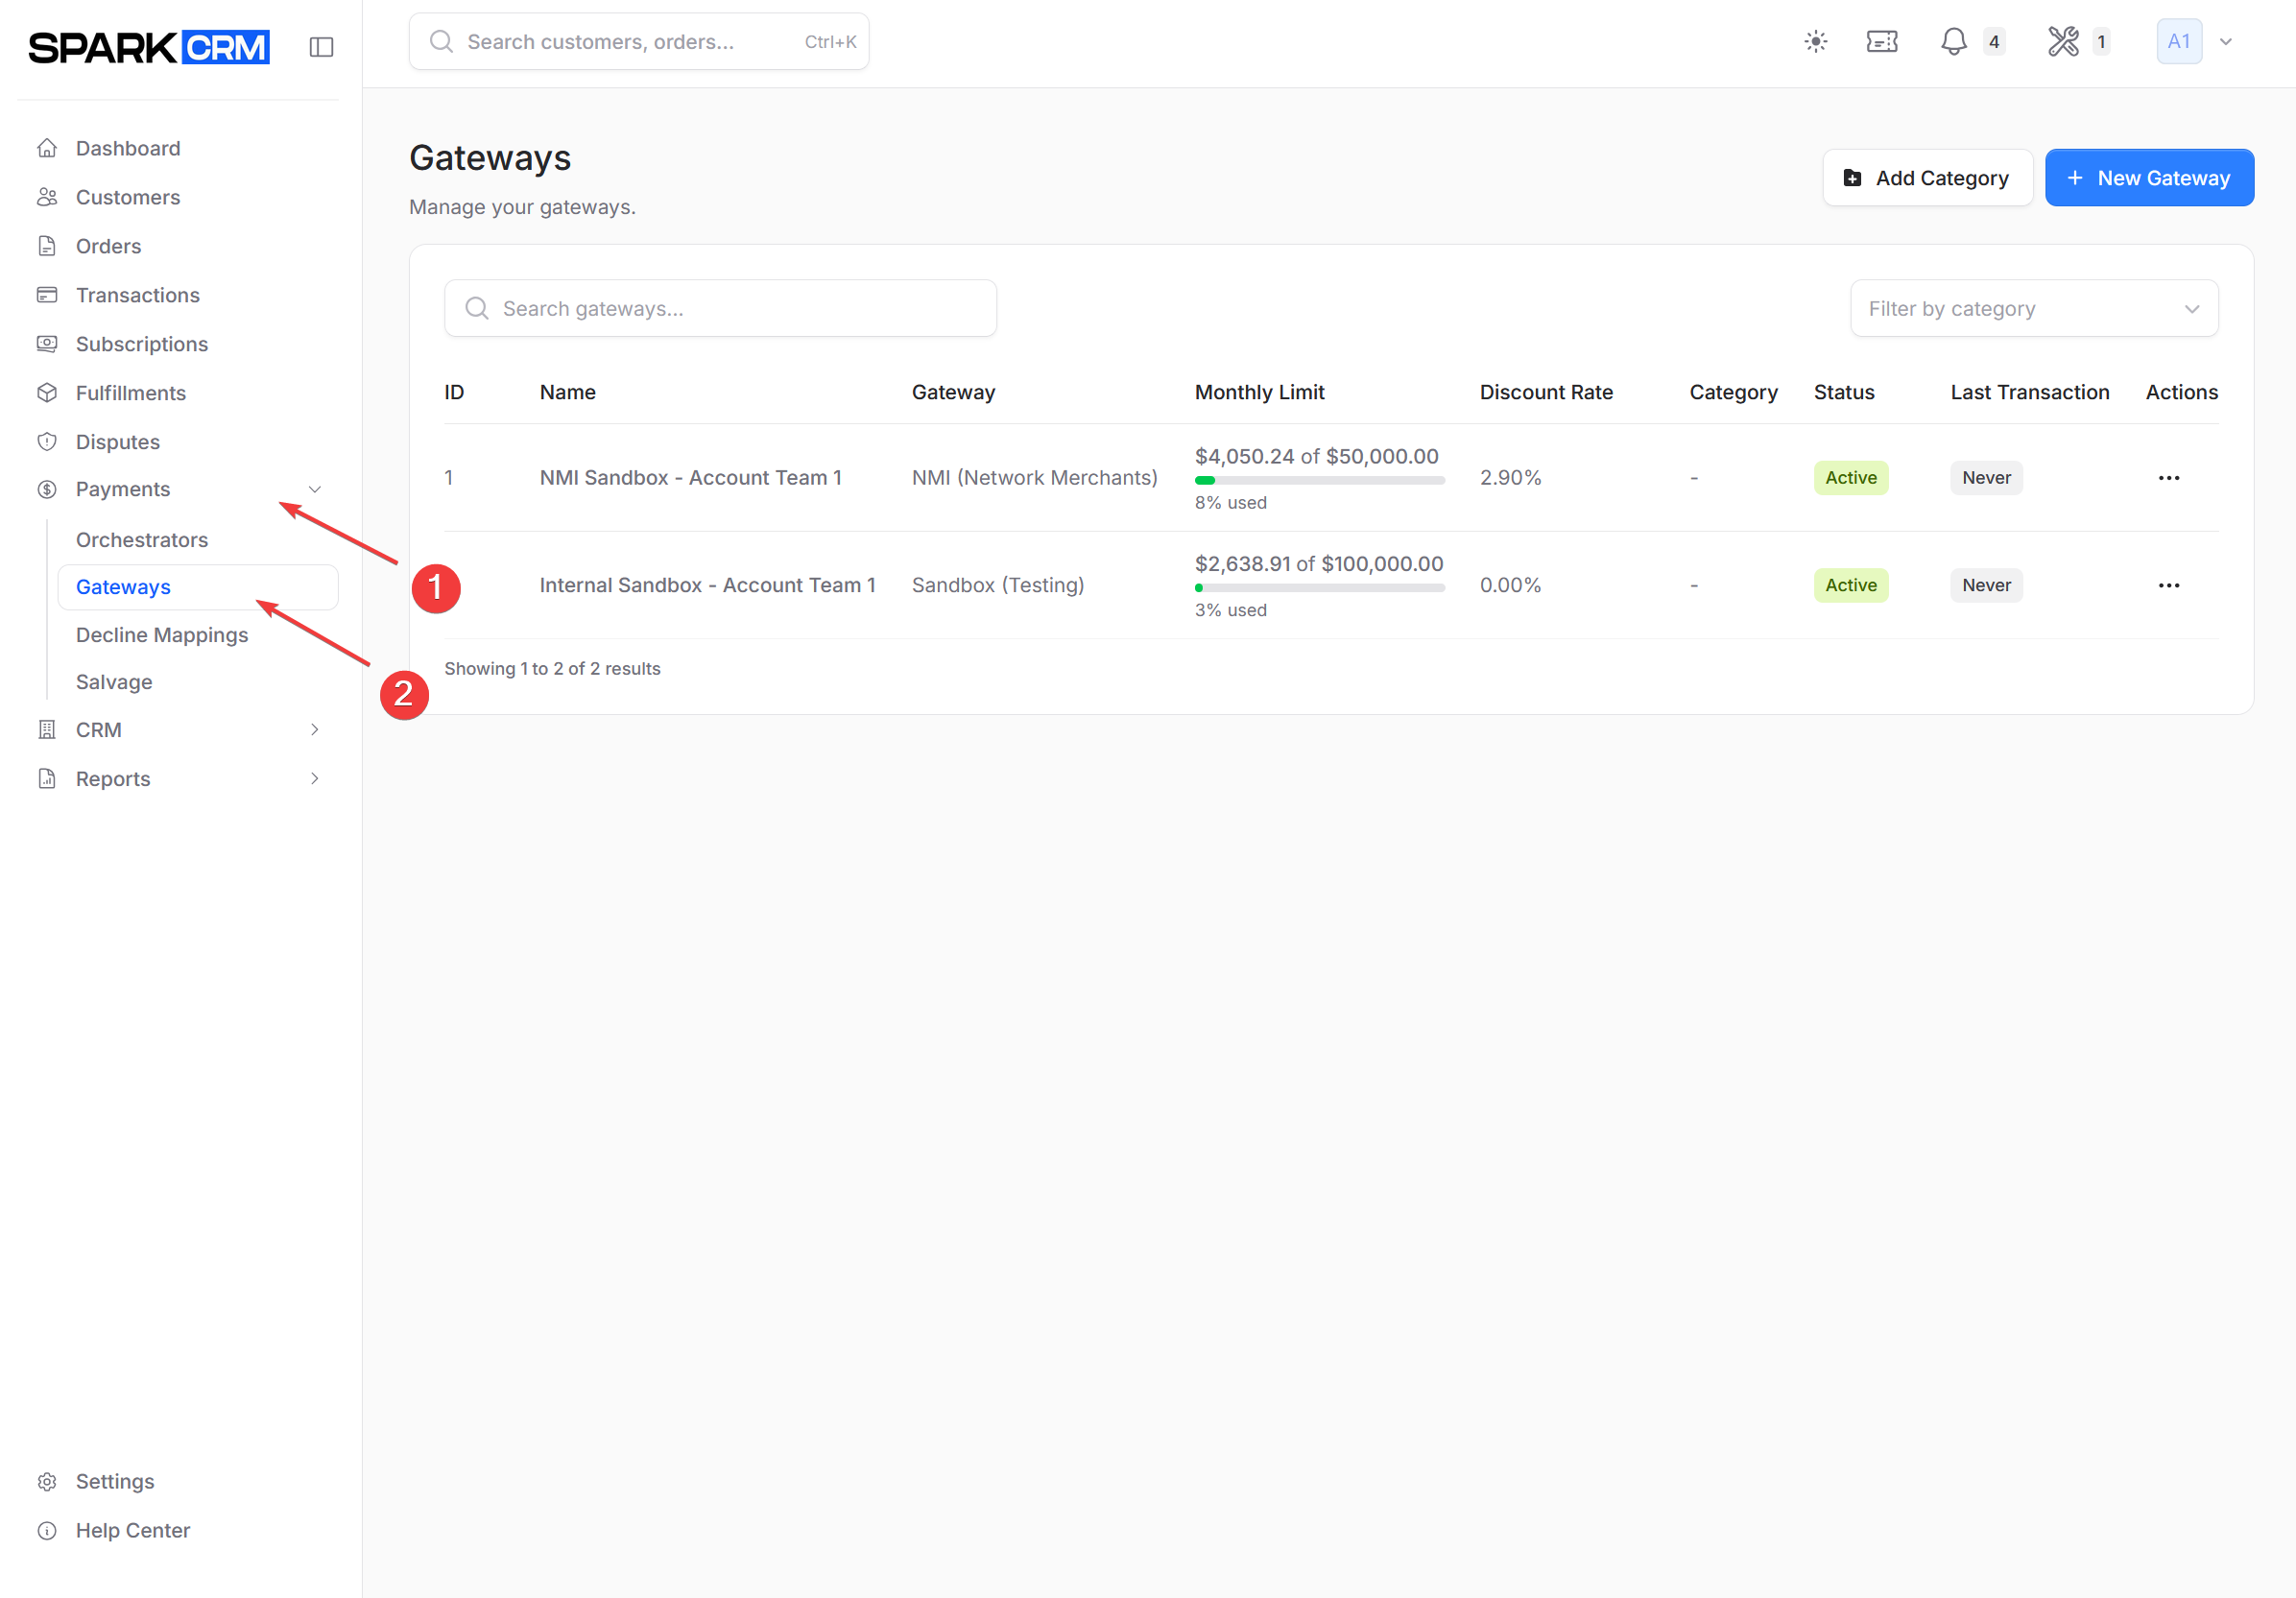
Navigation: Sidebar > Payments > Gateways
Supported Gateway Types
Spark CRM supports the following payment processors:
| Gateway | Description | Use Case |
|---|---|---|
| NMI (Network Merchants) | Popular payment gateway with extensive features | High-volume merchants, subscription billing |
| Stripe | Modern payment platform with global coverage | Startups, SaaS, international sales |
| Authorize.net | Established gateway with broad compatibility | Traditional e-commerce, existing integrations |
| Finix | Payment infrastructure platform | Enterprise, custom payment flows |
| Breeze | Merchant-of-record card processor with built-in 3D Secure, tokenization, and subscriptions | Card payments that require 3DS authentication |
| ConvesioPay | Card processor with signed webhook notifications | Merchants on ConvesioPay’s platform |
| PayNetWorx | Token-authenticated card processor | Merchants on PayNetWorx |
| Highwire Payments | Card processor with sandbox support | Existing Highwire merchants |
| Highwire Payments V2 | Current-generation Highwire integration | New Highwire merchants |
| Big Dogs Payments | Card processor with a configurable endpoint | Merchants on Big Dogs |
| Swiparas | Card processor with optional server-side Adyen CSE card encryption and optional HMAC-signed webhooks | Merchants on Swiparas |
| BridgePay | Card processor addressed by merchant account code | Merchants on BridgePay |
| Bulletproof Checkout | Card processor with key and credential pair authentication | Merchants on Bulletproof |
| Sandbox (Testing) | Testing gateway for development | Testing and development only |
Adding a Gateway
Step 1: Navigate to Gateways
- Go to Payments > Gateways in the sidebar
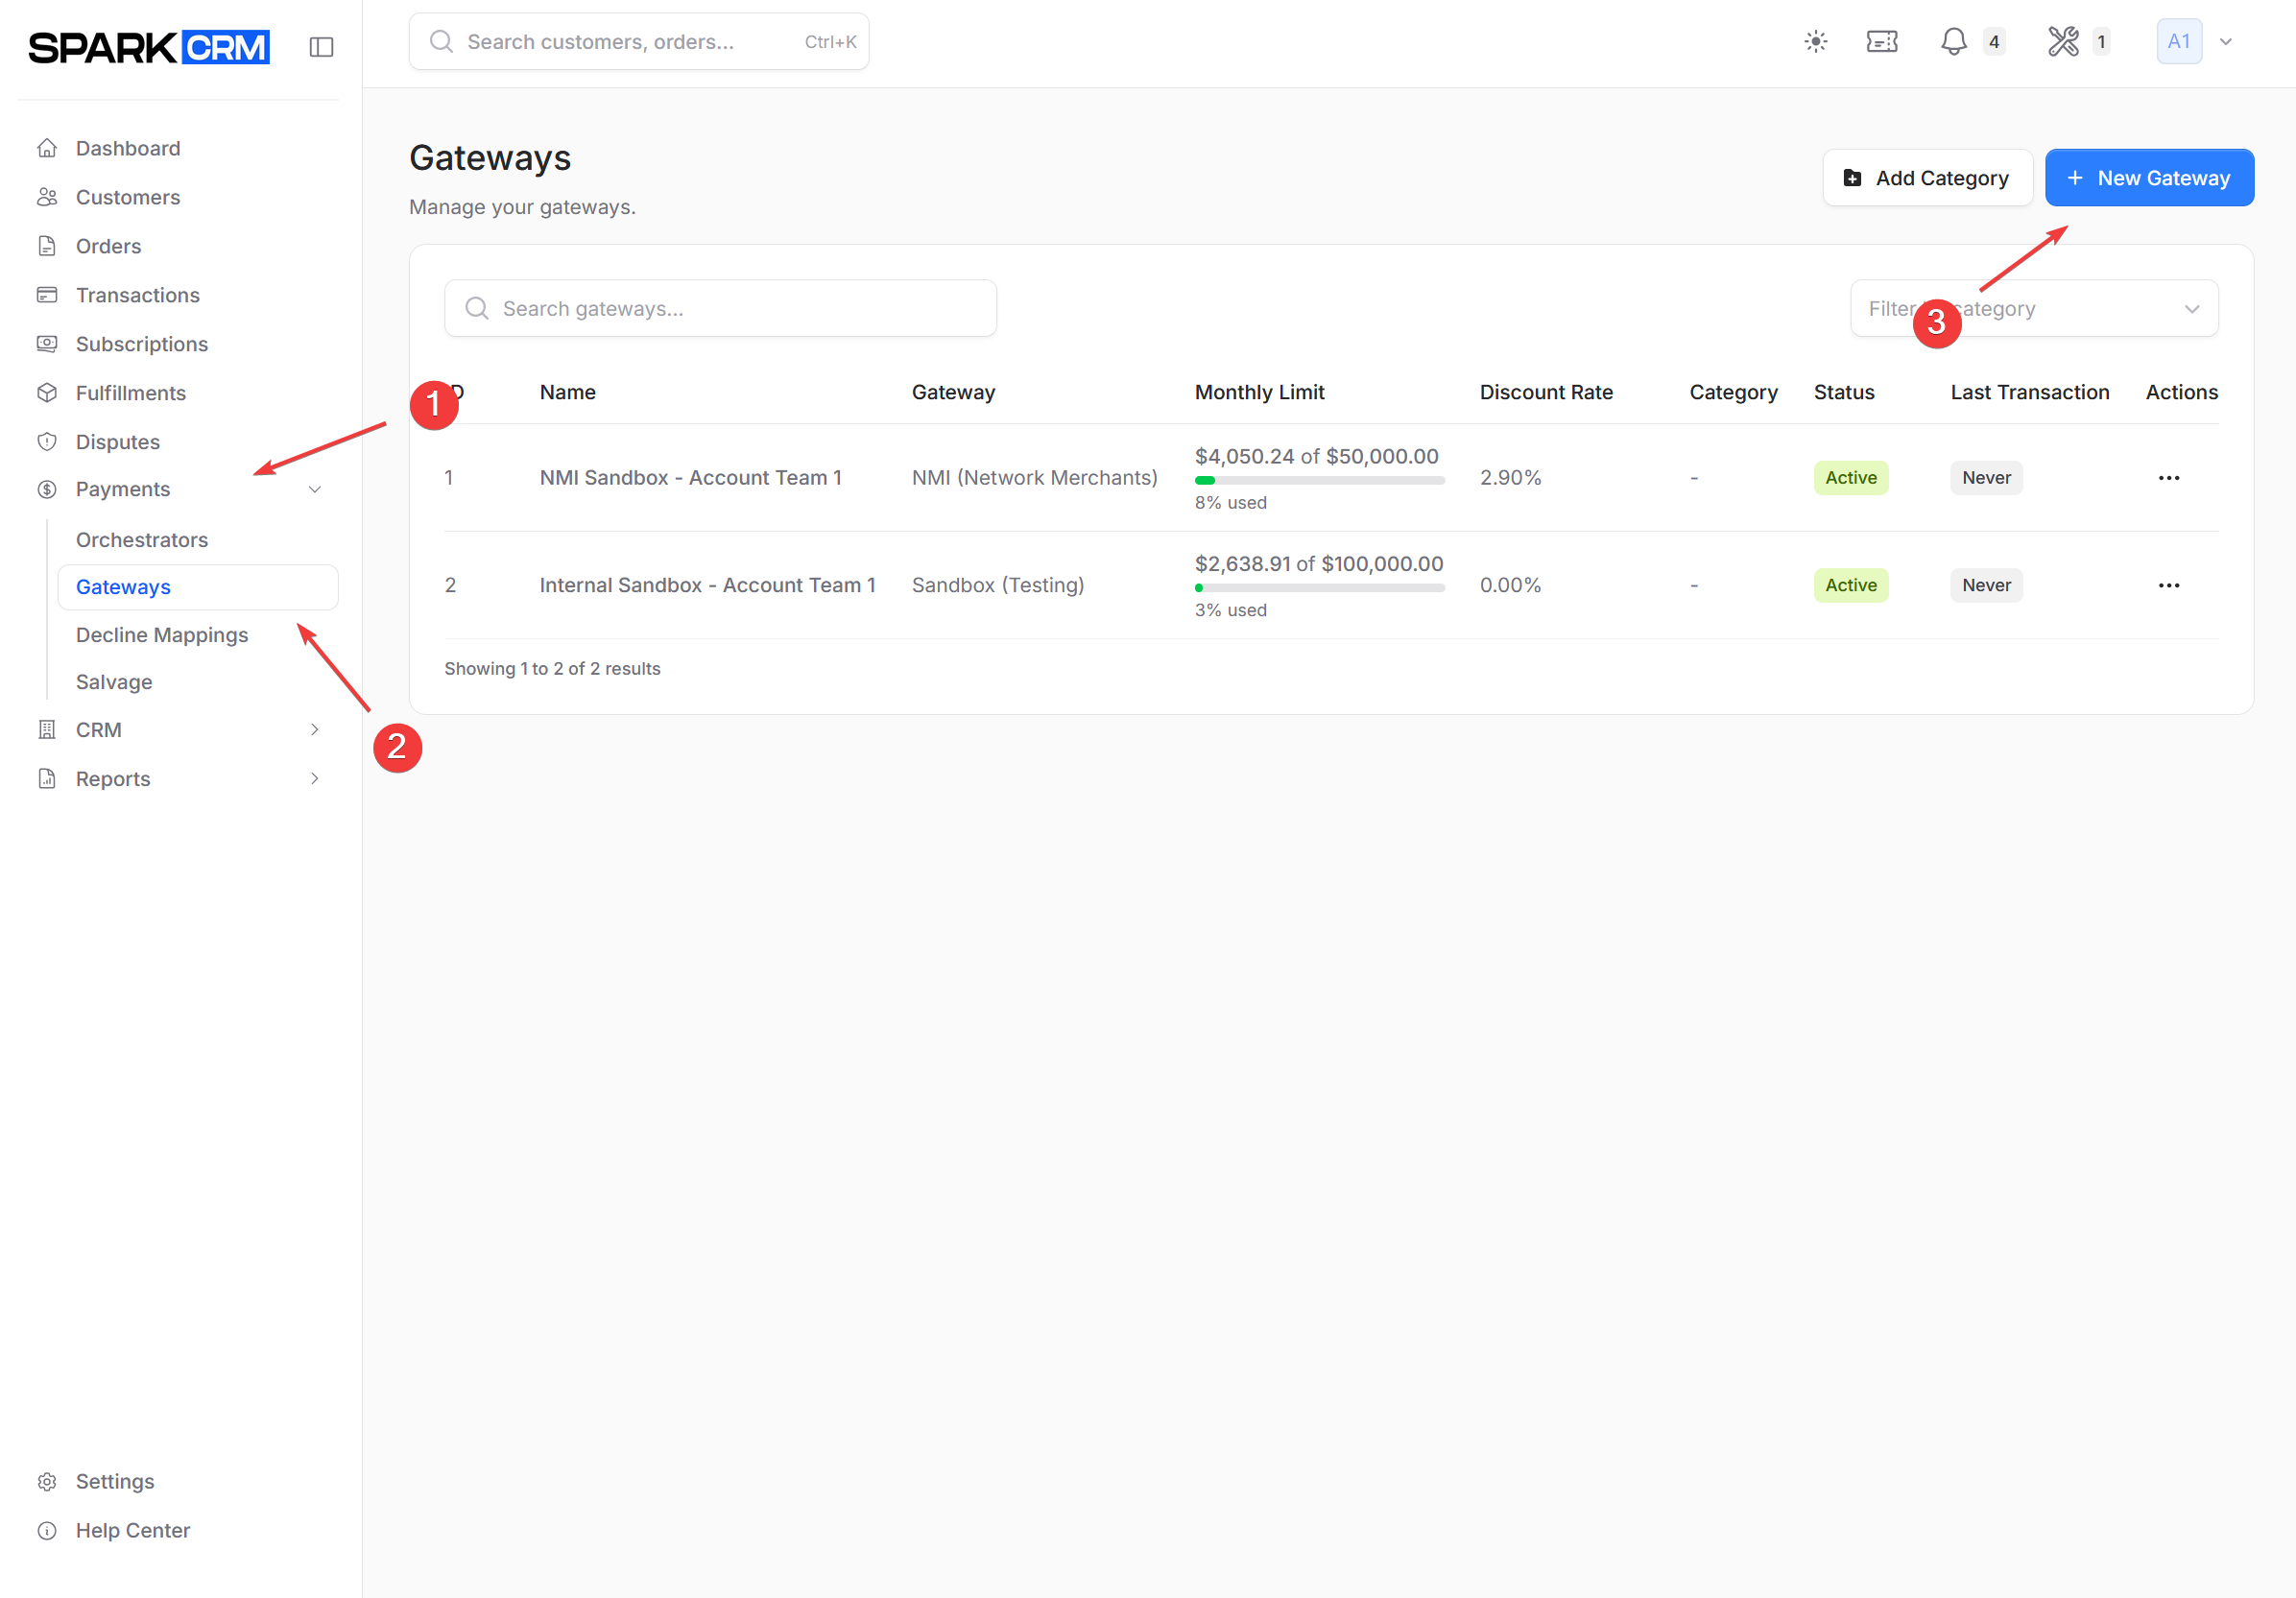
- Click the New Gateway button (top right of the Gateways page)
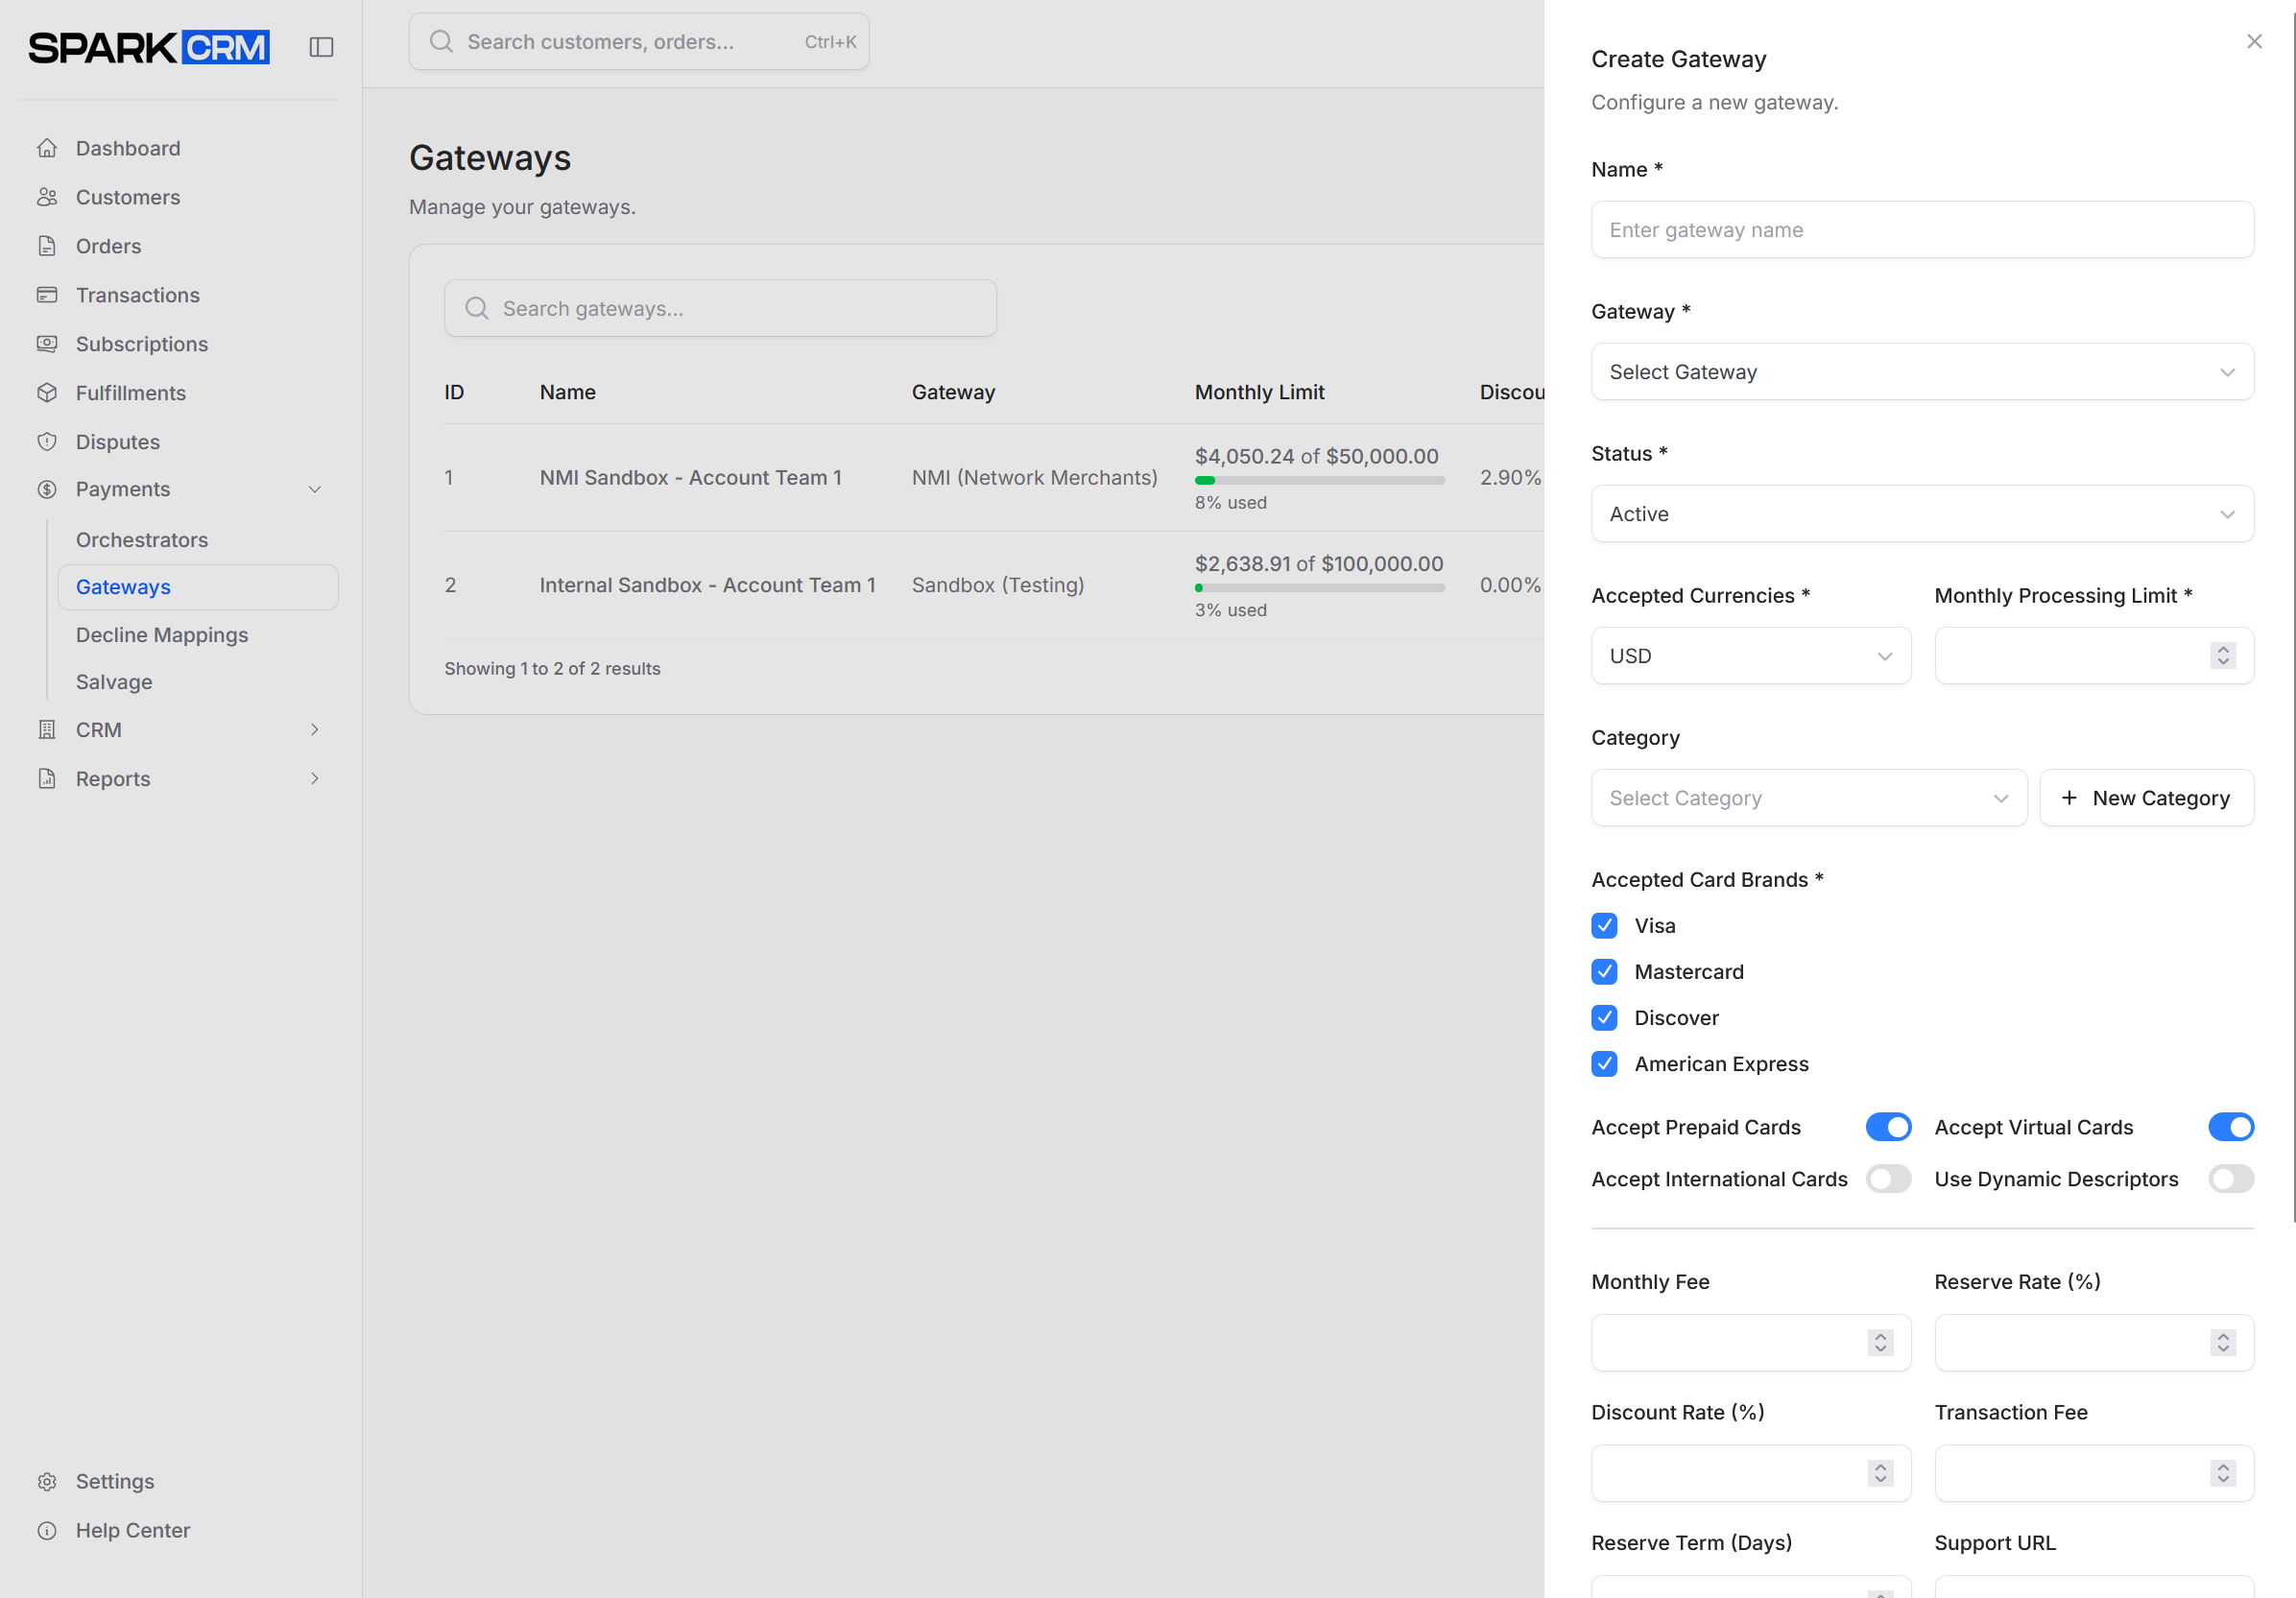
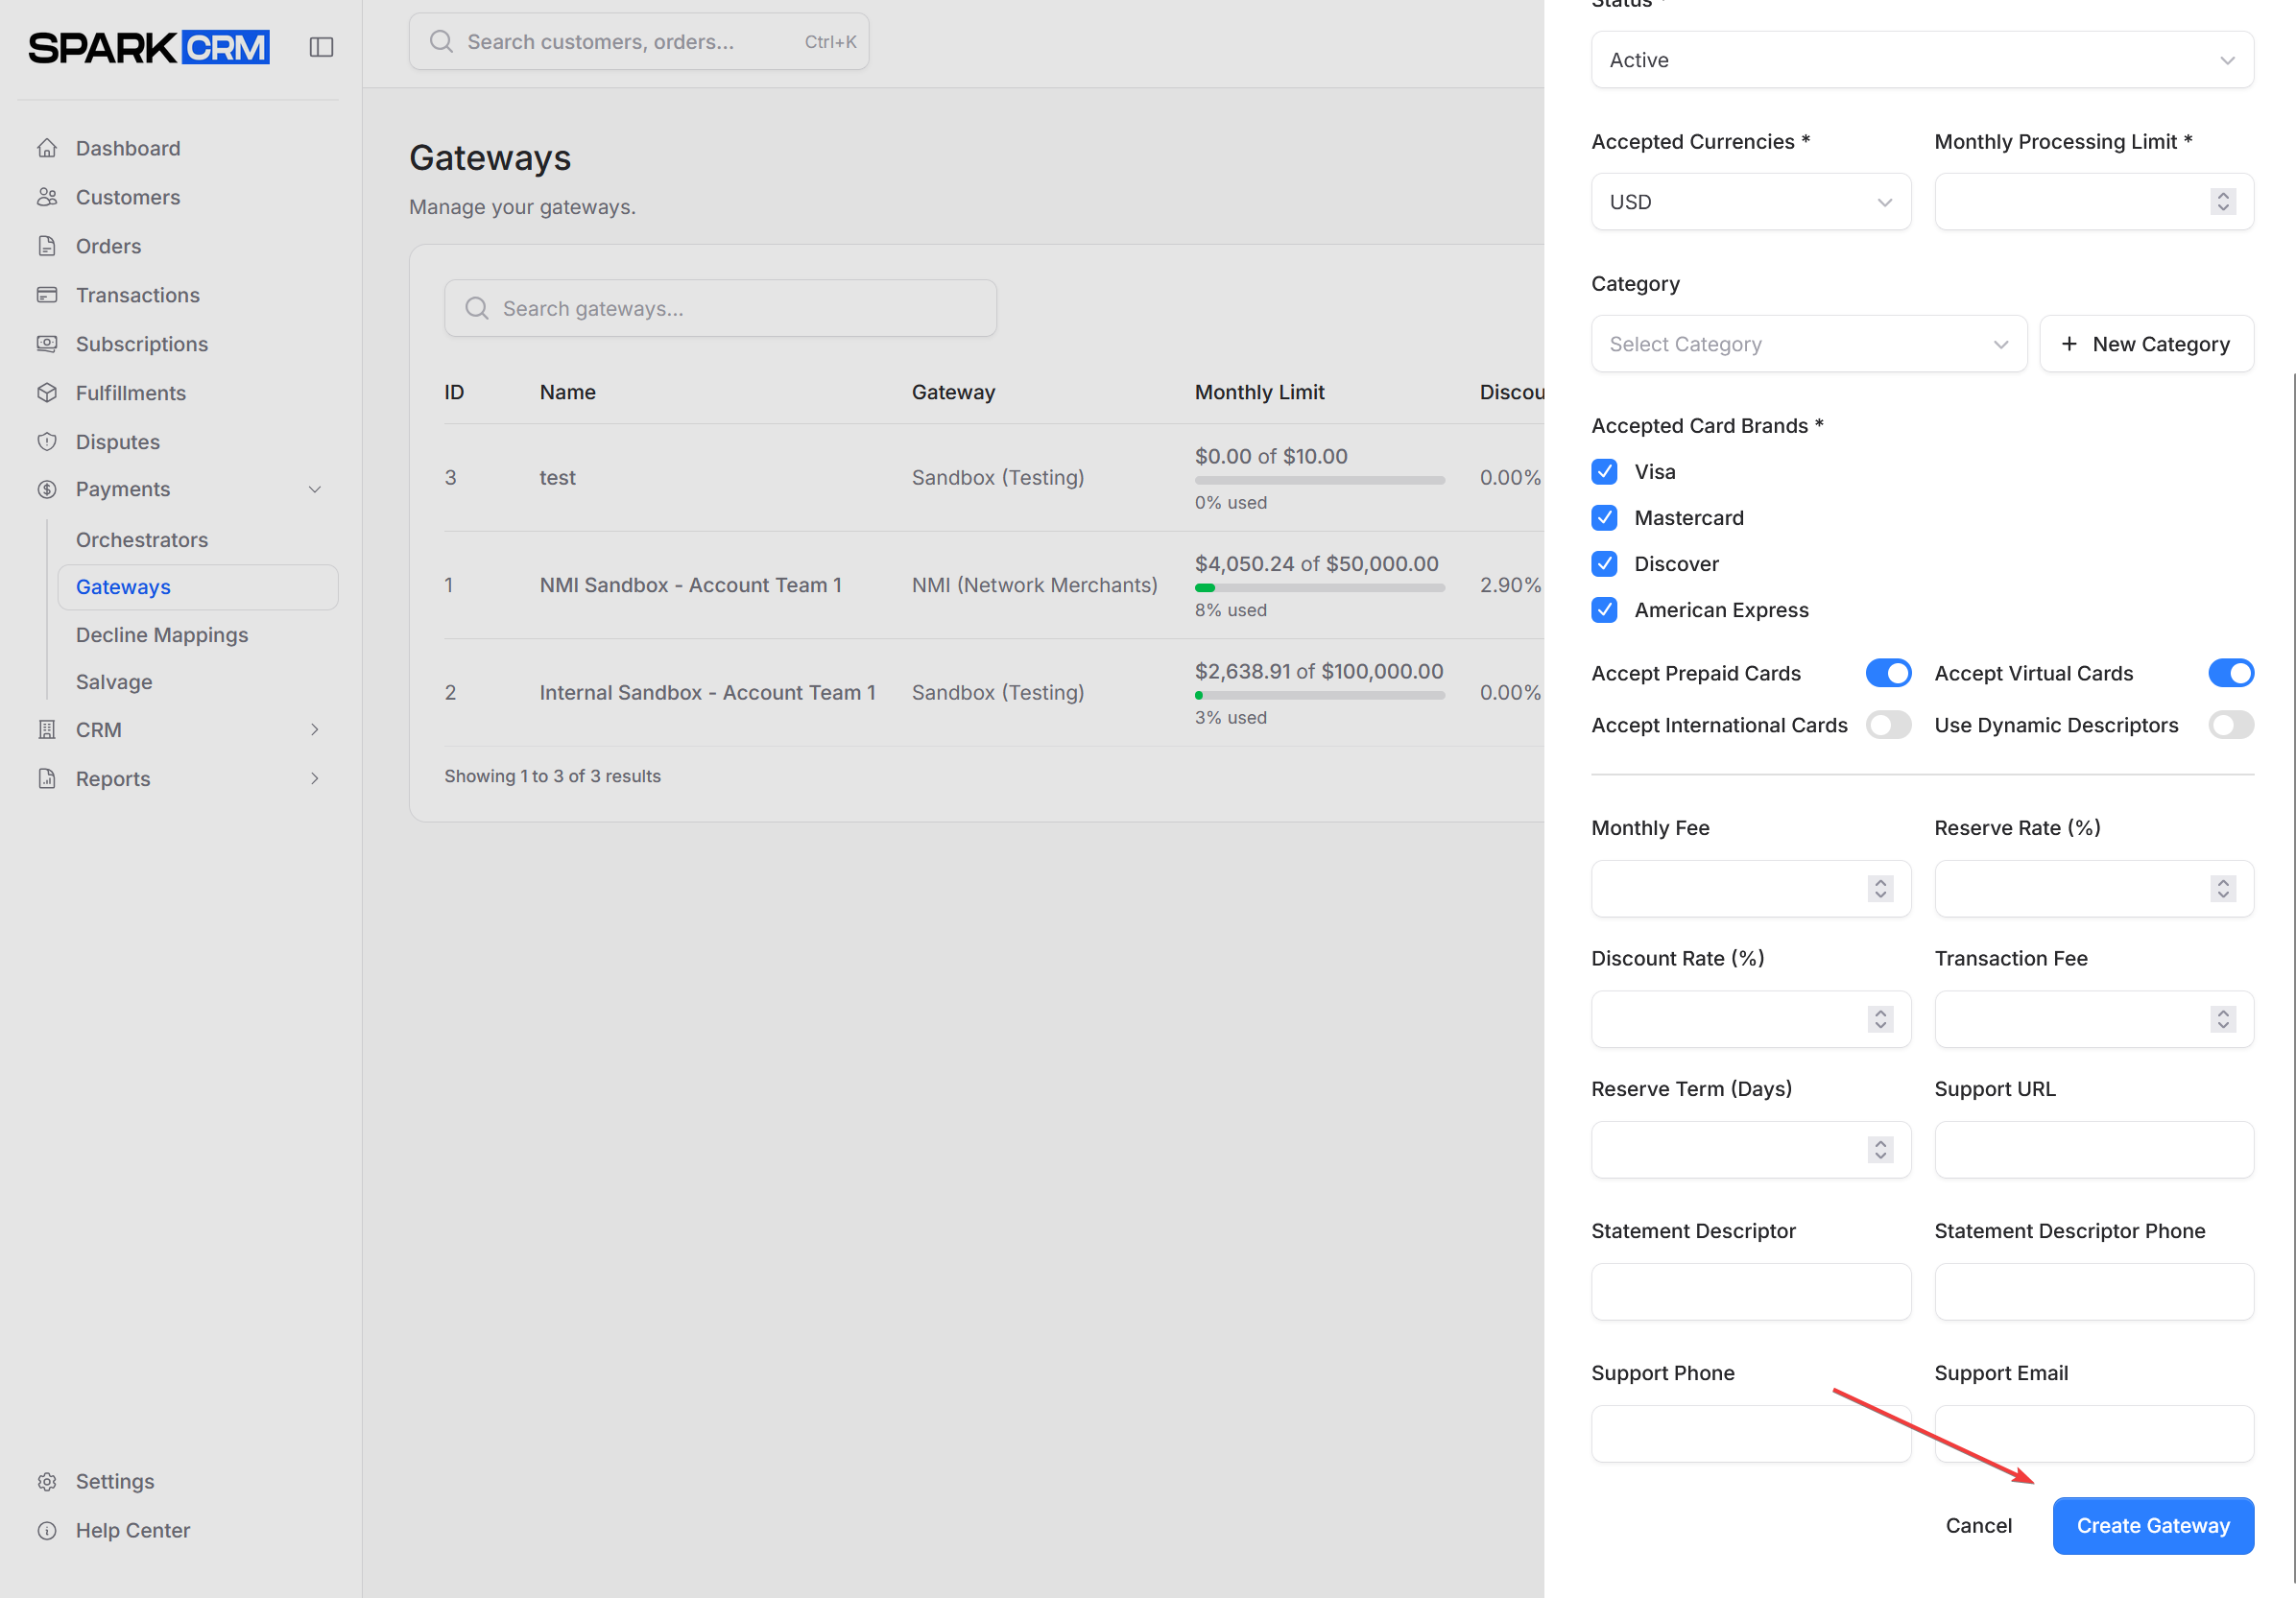
Step 2: Configure Basic Information
Enter the gateway details:
- Name: A descriptive name for this gateway (e.g., “Production Stripe”, “NMI Sandbox”)
- Gateway: Select your payment processor (the dropdown is sorted alphabetically)
- Status: Active, Inactive, Pending, Error or Suspended. Only Active gateways are used for new transactions, rebills, salvage and cascade routing — any other status stops processing.
- Category: Optional grouping for organization
Required to save: Name, Gateway, Status, Accepted Currencies (Step 6), Accepted Card Brands (Step 4), Timezone (Step 6) and Monthly Processing Limit (Step 5). Currencies default to USD, card brands to all four and Timezone to UTC — at least one card brand must stay selected — but Monthly Processing Limit starts blank — the gateway will not save until you enter a value (enter 0 if you don’t want to track a ceiling).
Step 3: Enter Credentials
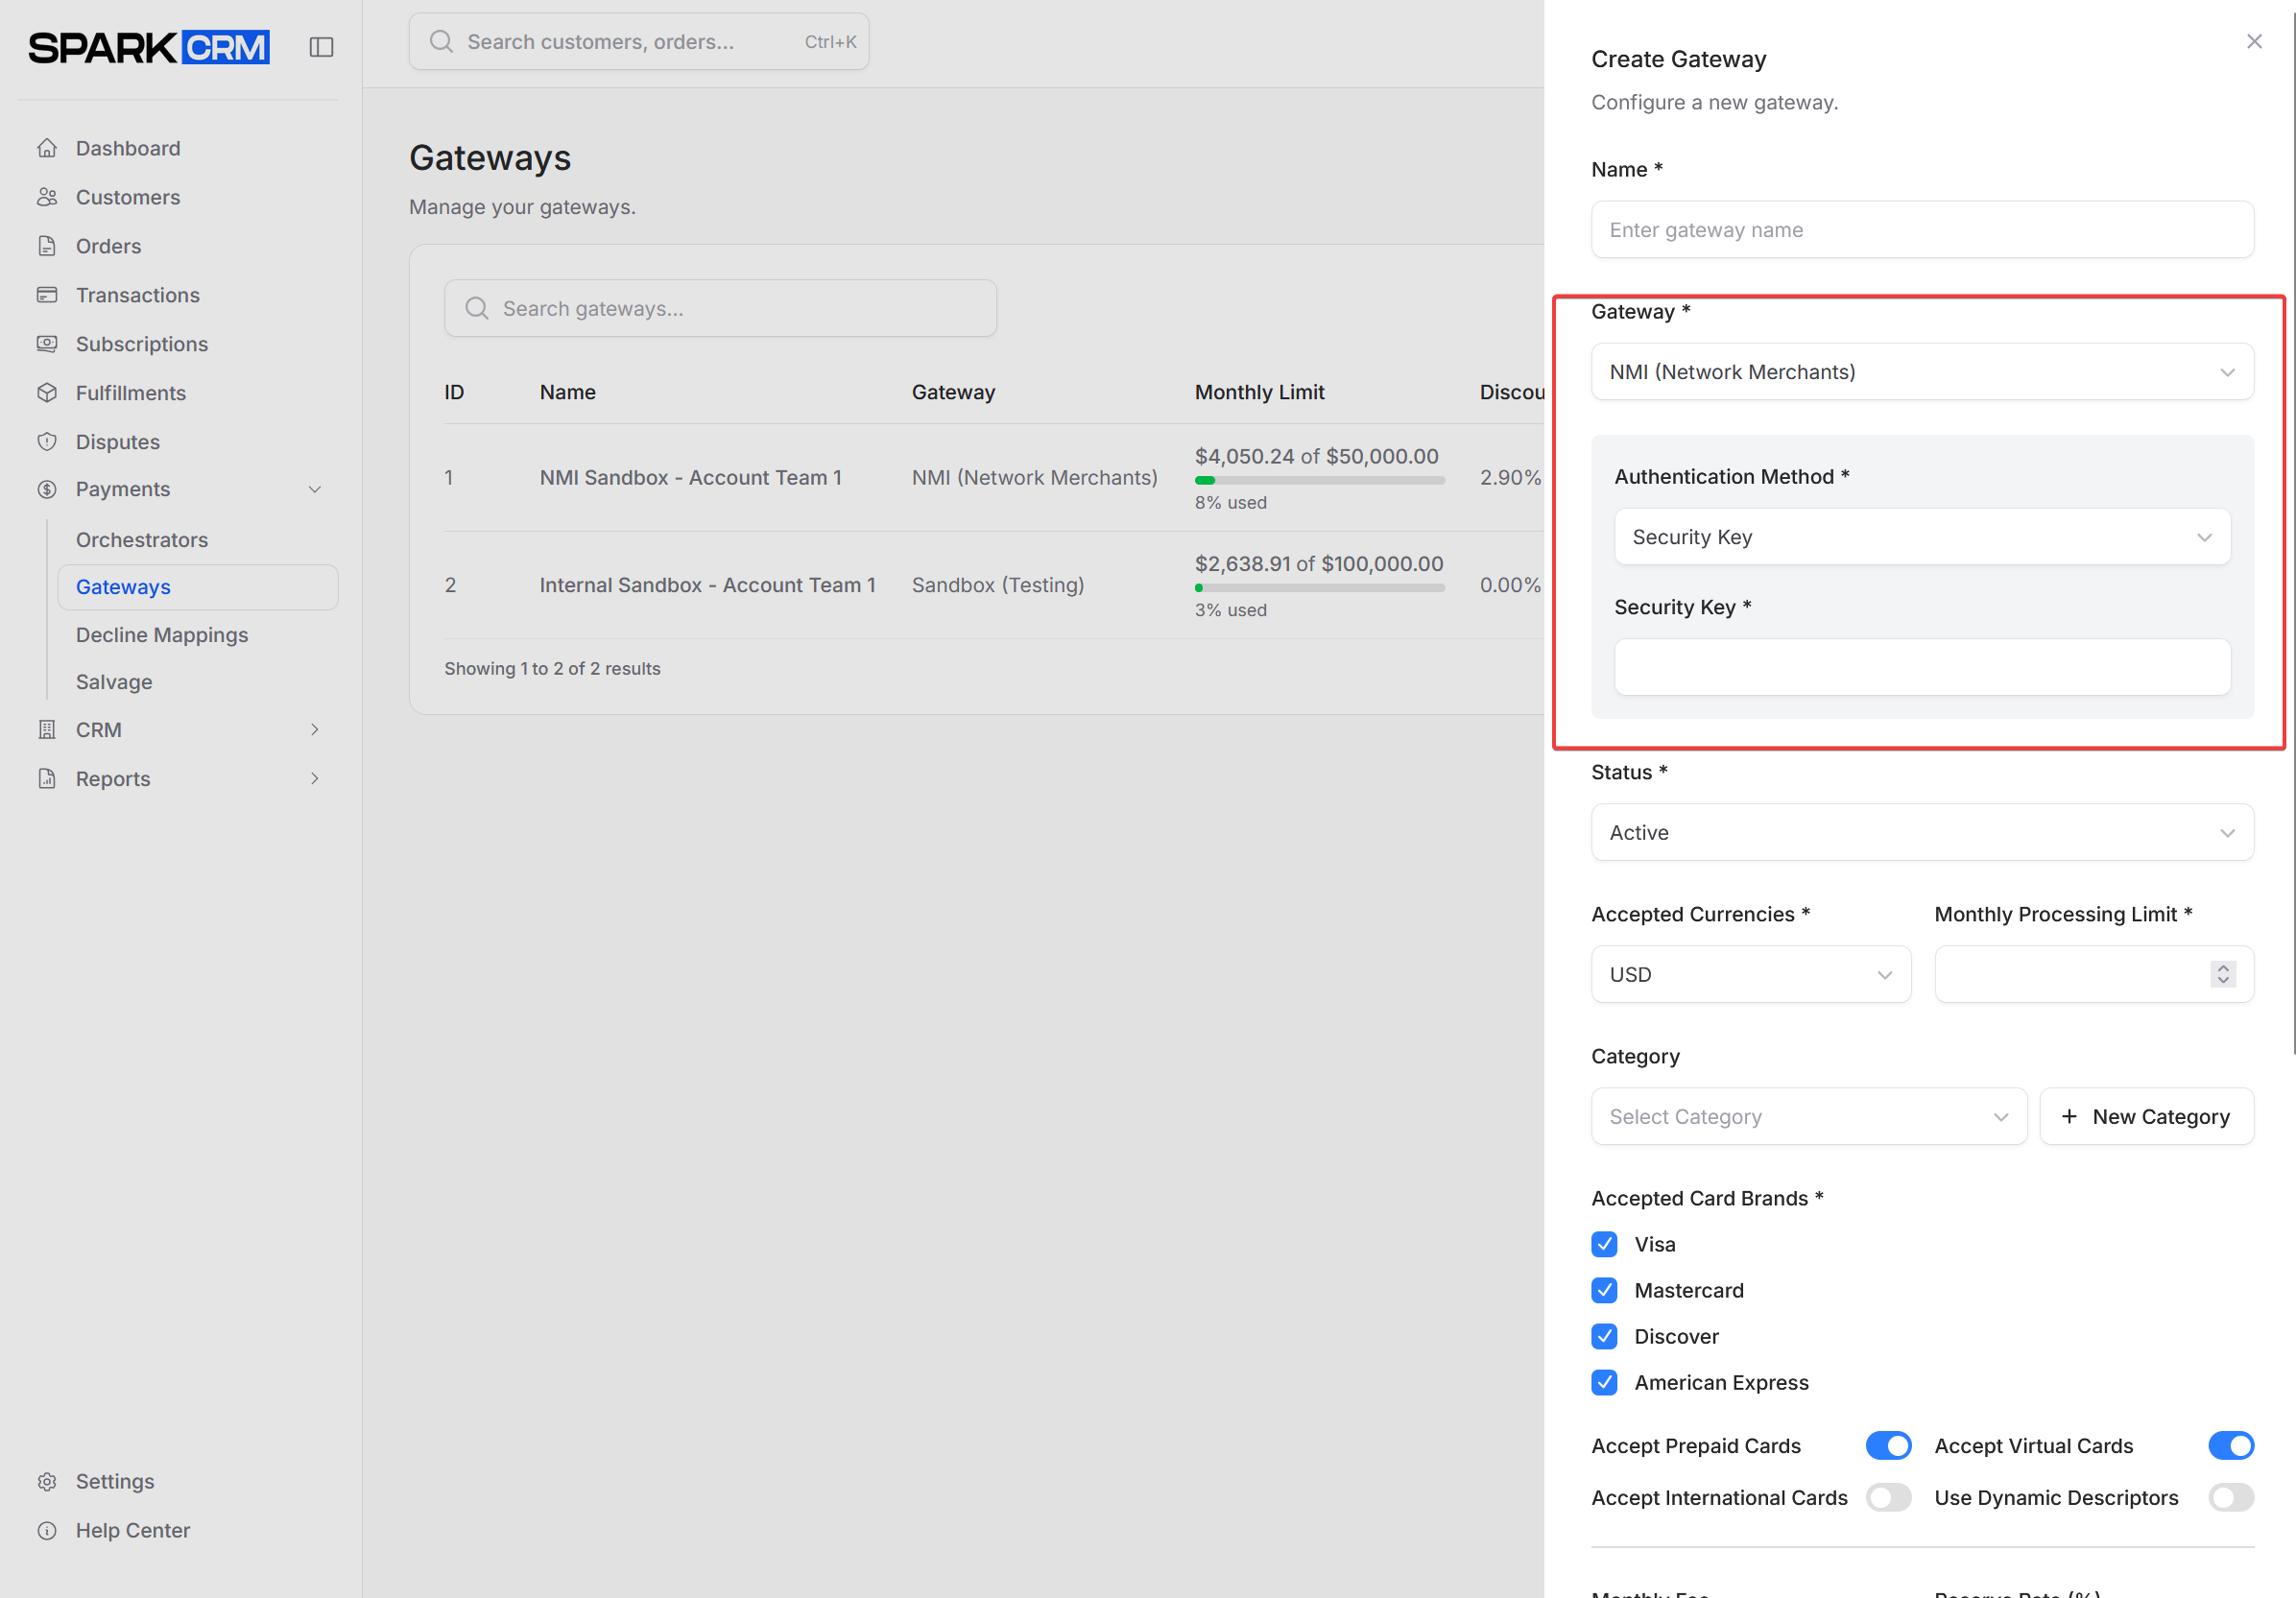
Each gateway type requires specific credentials:
NMI Credentials
Choose one authentication method:
Security Key Method:
- Security Key
Username/Password Method:
- Username
- Password
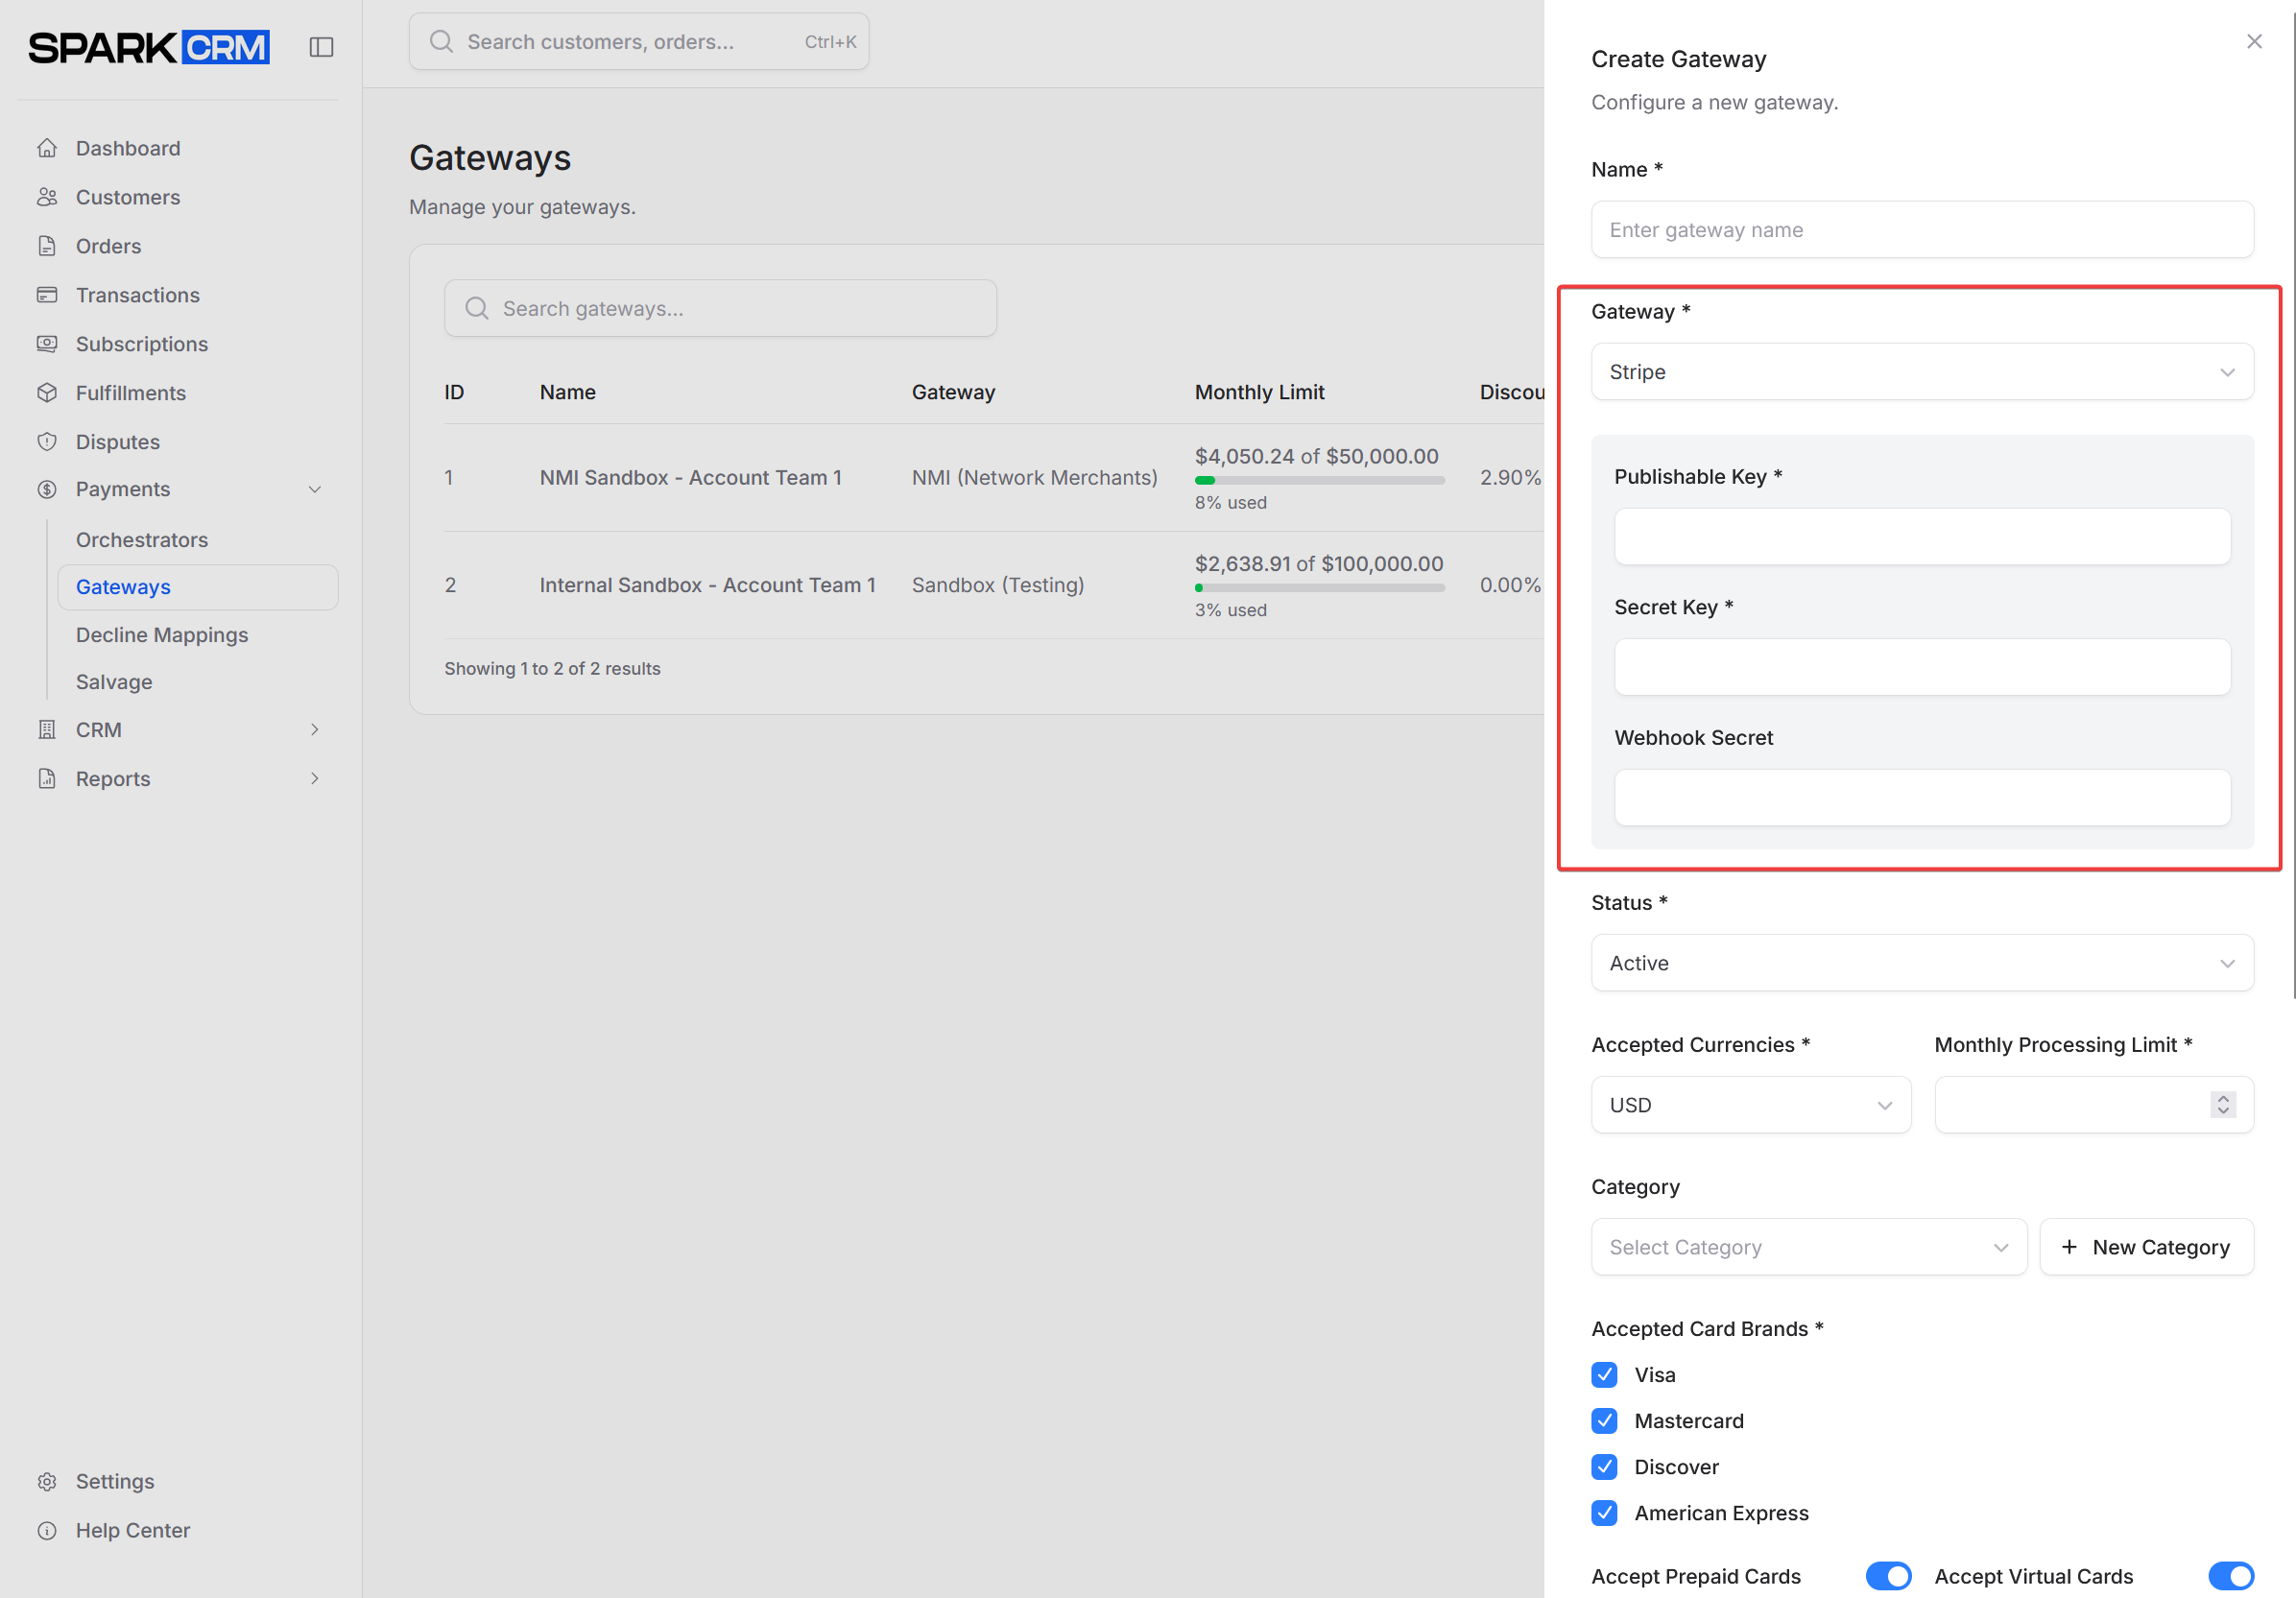
Stripe Credentials
- Publishable Key: Your Stripe publishable key (starts with
pk_) - Secret Key: Your Stripe secret key (starts with
sk_) - Webhook Secret: Optional, for webhook verification
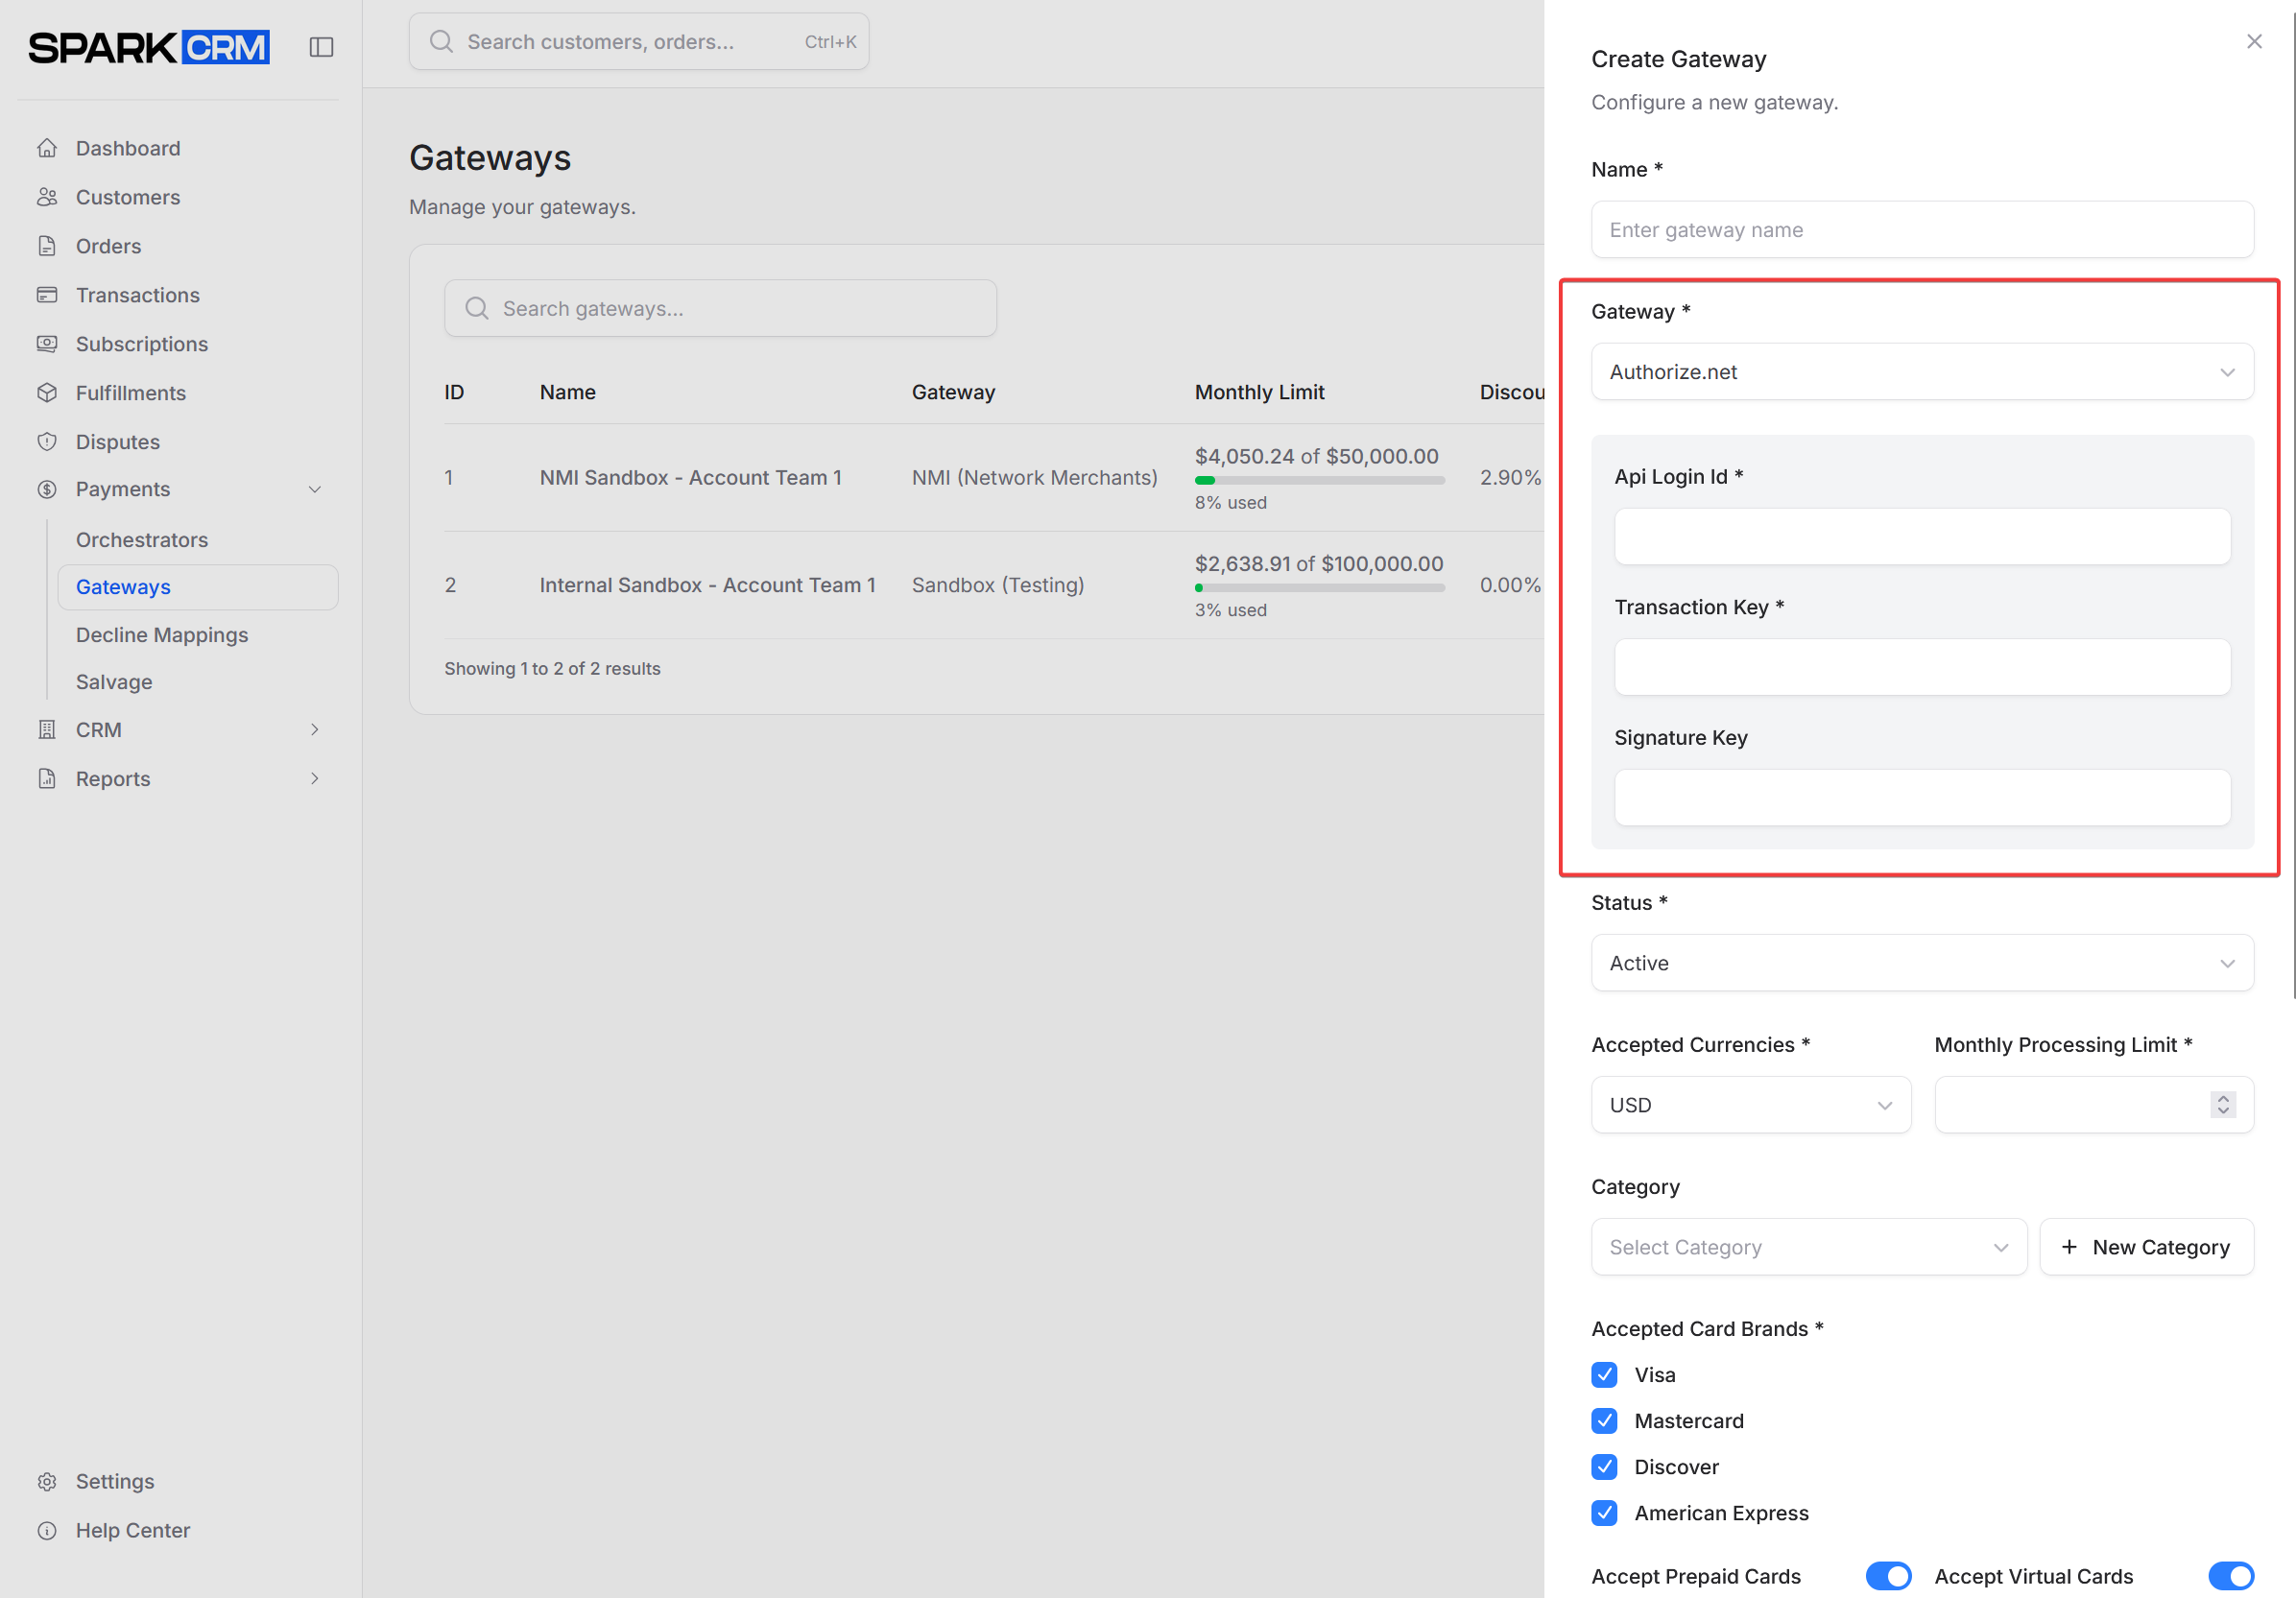
Authorize.net Credentials
- API Login ID: Your Authorize.net API login
- Transaction Key: Your transaction key
- Signature Key: Optional, for response verification
Finix Credentials
- Username: Finix API username
- Password: Finix API password
- Merchant ID: Your Finix merchant identifier
- Test Mode: Optional. Enable to route through Finix’s sandbox/QA environment. New Finix gateways are created with Test Mode off (production).
Sandbox (Testing) Credentials
- Mode: Choose behavior
always_approve- All transactions succeedalways_decline- All transactions failrandom- Random success/failure based on decline percentage
- Decline Percentage: When mode is
random, percentage of transactions to decline (0-100)
Breeze Credentials
- API Key: Your Breeze secret API key — starts with
sk_test_for sandbox orsk_live_for production - Webhook Secret: Optional. The webhook signing secret from your Breeze dashboard, used to verify incoming payment notifications
- Risk SDK Key: Optional in Spark CRM, but Breeze expects a risk session on customer-initiated card payments. Your checkout page uses this key to load Breeze’s Risk JS SDK and pass
payment.risk_session_idon the order. Merchant-initiated charges — subscription rebills and saved-card upsells — omit the risk object entirely. - Test Mode: Routes through Breeze’s sandbox environment. Defaults to on for this gateway type.
Test Mode starts ON for this gateway type. Selecting Breeze automatically switches Test Mode on and charges post to Breeze’s sandbox host (
secure-sandbox.breeze.cash). Turn Test Mode off and save before you send live traffic — live credentials with Test Mode on take no real money.
Webhook setup: After you select Breeze, the credentials form displays a webhook URL. Copy it into your Breeze dashboard’s webhook settings so Spark CRM receives payment status updates (successful payments, refunds, expirations).
Important — 3D Secure is required: Breeze authenticates every customer-initiated card payment with 3D Secure — new and saved cards. Your checkout must complete a short customer redirect before the payment is captured. Wire your funnel using Breeze 3D Secure Checkout. Subscription rebills and one-click upsells that reuse a card already on file are sent as merchant-initiated stored-credential charges: they skip 3DS and the risk session, and process with no redirect.
ConvesioPay Credentials
- Secret Key: Your ConvesioPay secret key
- API Key: Your ConvesioPay API key
- Integration Name: The integration identifier issued by ConvesioPay
- Webhook Signature Key: Used to verify inbound payment notifications
- Test Mode: Enable to route through the sandbox environment
PayNetWorx Credentials
- Access Token User: Your PayNetWorx access token user
- Access Token Password: Your PayNetWorx access token password
- Test Mode: Enable to route through the sandbox environment
Highwire Payments Credentials
- Merchant Username: Your Highwire merchant username
- Merchant Password: Your Highwire merchant password
- Test Mode: Enable to route through Highwire’s sandbox environment
Highwire Payments V2 takes the same three fields.
Test Mode starts ON for this gateway type. Selecting Highwire Payments V2 automatically switches Test Mode on and charges post to Highwire’s staging host (
api-payments-staging.highwirepayments.com). Turn Test Mode off and save before you send live traffic — live credentials with Test Mode on take no real money.
V2 is a separate gateway type rather than an upgrade in place, so existing Highwire Payments gateways keep processing unchanged. To move over: create a new V2 gateway, turn Test Mode off, test the connection, then switch your orchestrator over to it.
Big Dogs Payments Credentials
- Base URL: The processing endpoint issued to your account
- Username: Your Big Dogs username
- Password: Your Big Dogs password
- Test Mode: Recorded but not used by the Big Dogs integration. Sandbox versus production is decided entirely by the Base URL above - point it at the sandbox endpoint Big Dogs issued you for testing, and change it to the production URL when you go live.
Swiparas Credentials
- API Key: Your Swiparas API key
- Merchant Account: Your Swiparas merchant account identifier
- Store ID: Optional store identifier, when your account is split across stores
- CSE Public Key: Optional. When supplied, Spark CRM encrypts the card into an Adyen CSE blob on the server before sending it to Swiparas, so raw card data never reaches the processor. (Checkouts that already send a client-side pre-encrypted card are passed through unchanged and do not use this key.)
- Webhook HMAC Key: Optional. Verifies inbound payment notifications
- Base URL: Optional override for the processing endpoint
- Test Mode: Routes through the sandbox environment. Defaults to on for this gateway type.
Test Mode starts ON for this gateway type. Selecting Swiparas automatically switches Test Mode on and charges post to the Adyen test host (
checkout-test.adyen.com). Turn Test Mode off and save before you send live traffic — live credentials with Test Mode on take no real money.
BridgePay Credentials
- Username: Your BridgePay username
- Password: Your BridgePay password
- Merchant Account Code: The merchant account code issued by BridgePay
- Test Mode: Routes through the sandbox environment. Defaults to on for this gateway type.
Test Mode starts ON for this gateway type. Selecting BridgePay automatically switches Test Mode on and charges post to BridgePay’s test host (
bridgepaynetsecuretest.com). Turn Test Mode off and save before you send live traffic — live credentials with Test Mode on take no real money.
Bulletproof Checkout Credentials
- API Key: Your Bulletproof API key
- API Secret: Your Bulletproof API secret
- Username: Your Bulletproof username
- Password: Your Bulletproof password
- Test Mode: Enable to route through the sandbox environment
Step 4: Configure Card Processing Settings
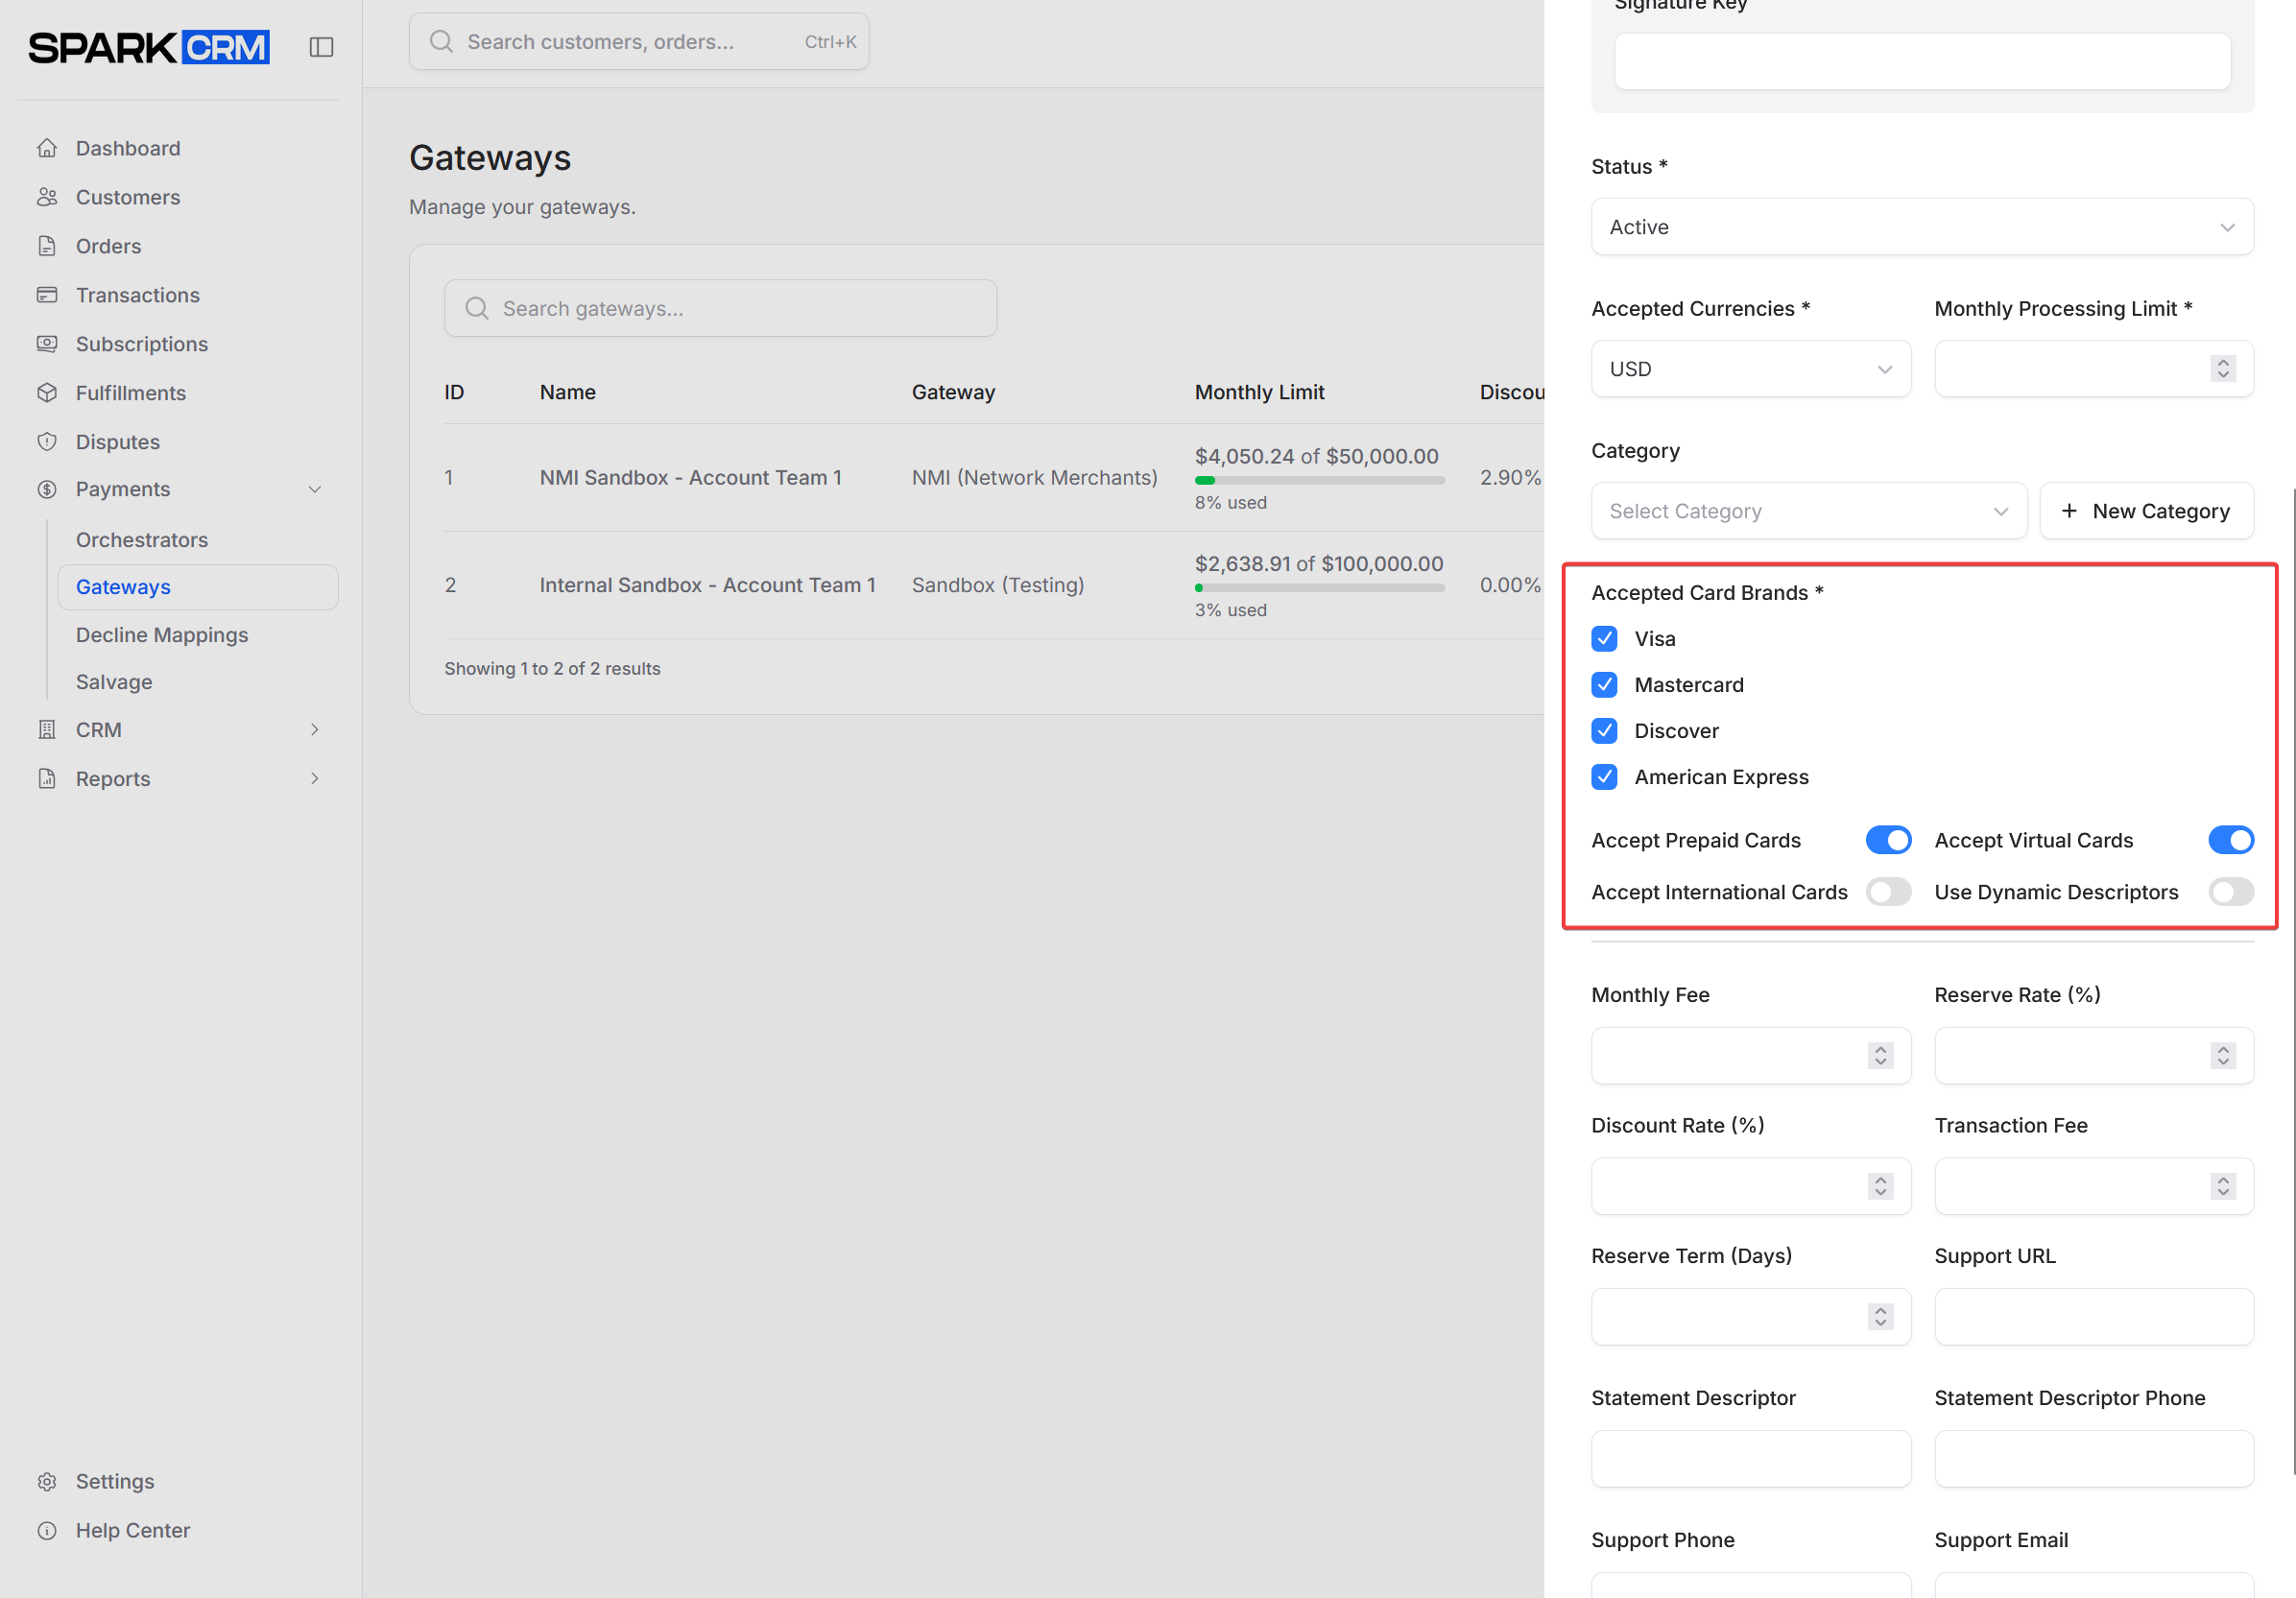
Accepted Card Brands:
- Visa
- Mastercard
- Discover
- American Express
Card Options:
- Accept Prepaid Cards: Allow prepaid/gift cards
- Accept Virtual Cards: Recorded for reference only. Spark CRM stores this flag and shows it on the gateway’s orchestrator panel, but it does not currently block virtual card numbers. (Only Accept Prepaid Cards is enforced during routing.)
- Accept International Cards: Defaults to off for gateways created in the UI, and is currently informational only — Spark CRM records the flag but does not block foreign-issued cards either way.
- Use Dynamic Descriptors: Stored for reference only. Spark CRM does not vary the descriptor it sends to the processor, so toggling this changes nothing in the outbound request.
Step 5: Configure Financial Settings
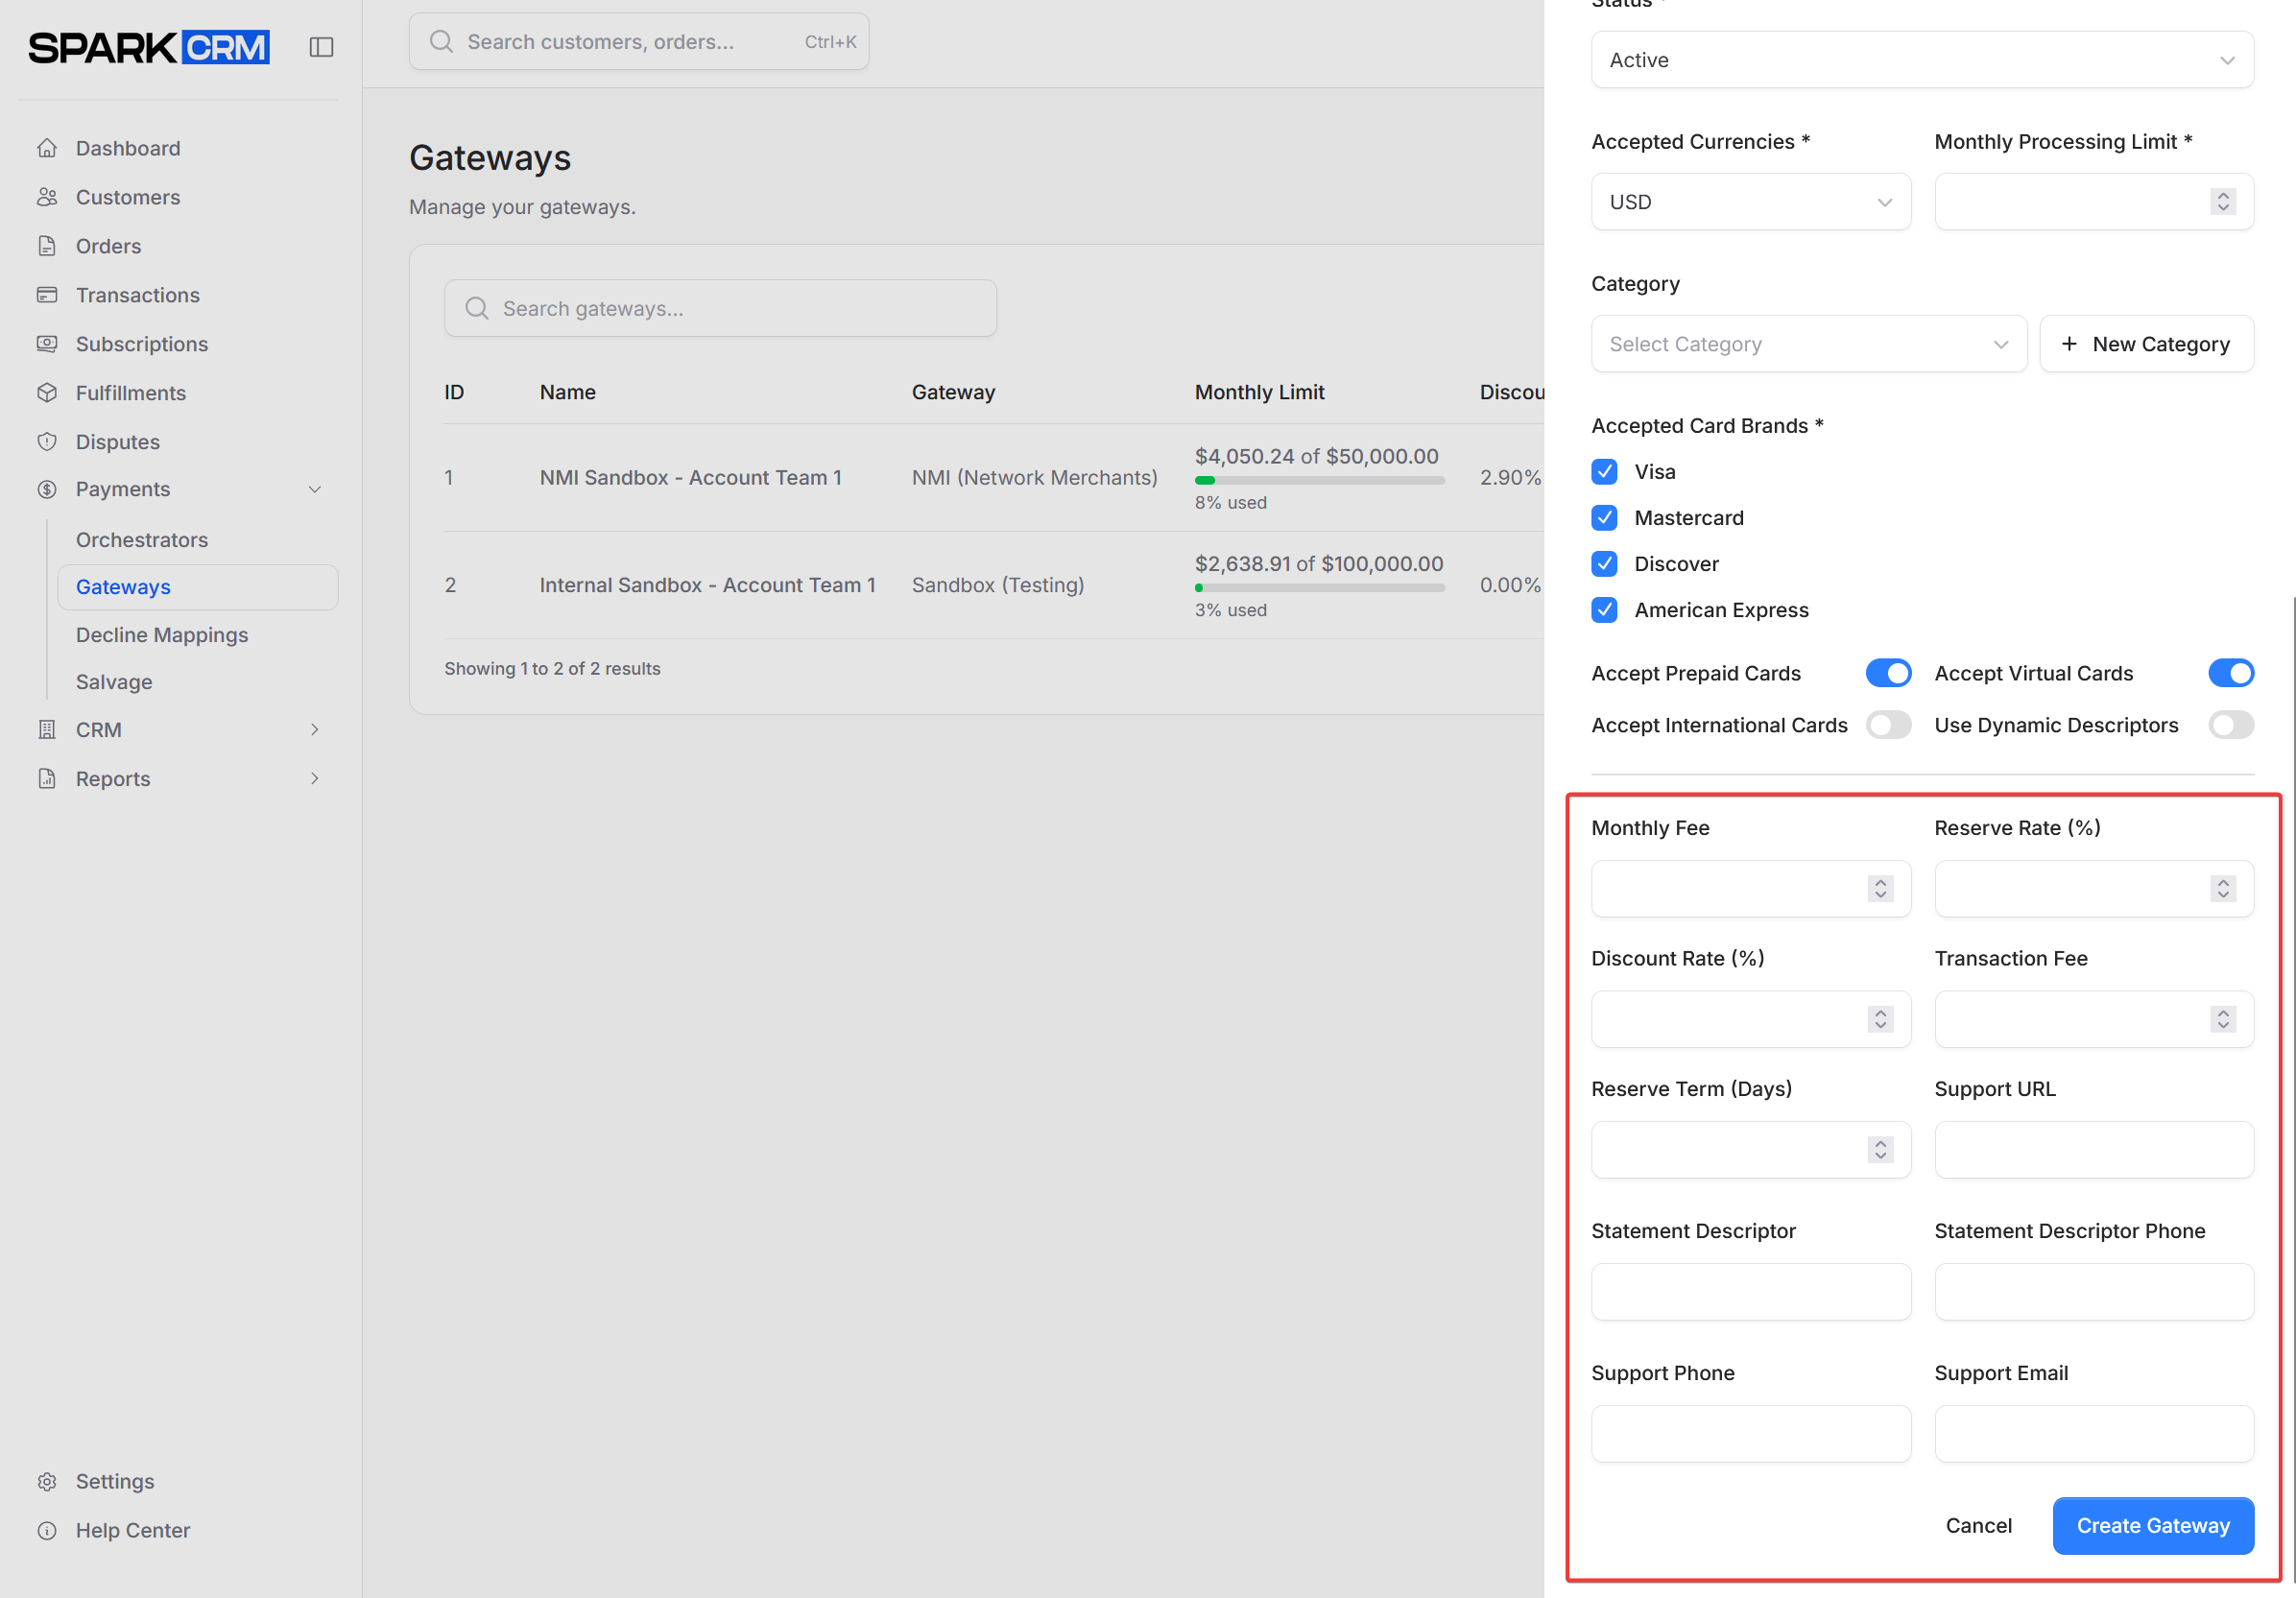
- Monthly Processing Limit (required): Your monthly volume ceiling. Drives the usage bar on the gateway list and the capacity alert notifications — it does not block transactions on its own. The gateway will not save while this is blank; enter 0 if you do not want to track a ceiling.
- Daily Processing Limit: Optional. When set, new sales stop routing to this gateway once that day’s approved volume plus the pending charge would exceed it; subscription rebills are excluded from this check during normal gateway selection and their volume does not count toward the day's total. Counters reset at midnight in the gateway’s Timezone (Step 6).
- Monthly Fee: Gateway monthly fee (for cost tracking)
- Reserve Rate: Percentage held in reserve
- Discount Rate: Processing discount rate
- Transaction Fee: Per-transaction fee
- Reserve Term Days: Days funds held in reserve
- Support URL: Link to your support page (this field sits with the fee fields, not with the other support fields)
Step 6: Configure Regional Settings
- Accepted Currencies: Which currencies this gateway can process (e.g., USD, EUR, GBP)
- Timezone: The timezone whose midnight resets this gateway’s daily and monthly processing counters (required; defaults to UTC). The gateway list shows it as Resets at midnight ·
<timezone>.
Step 7: Configure Statement Descriptor
Record the descriptor your processor is configured to show on customer statements:
- Statement Descriptor: The descriptor your processor shows on customer card statements. Spark CRM records it for reference — it appears in receipt emails and is returned as
gateway_descriptorin DTC API responses, but it is not sent to the processor, so the real descriptor must be set with your processor. Accepts up to 255 characters without truncation, but most card networks cut the descriptor at roughly 22 characters — keep it short. - Statement Descriptor Phone: Support phone number on statements
Step 8: Configure Support Information
Contact information for customer support:
- Support Phone: Customer support phone number
- Support Email: Customer support email
Step 9: Save and Test
- Click Create Gateway to create the gateway
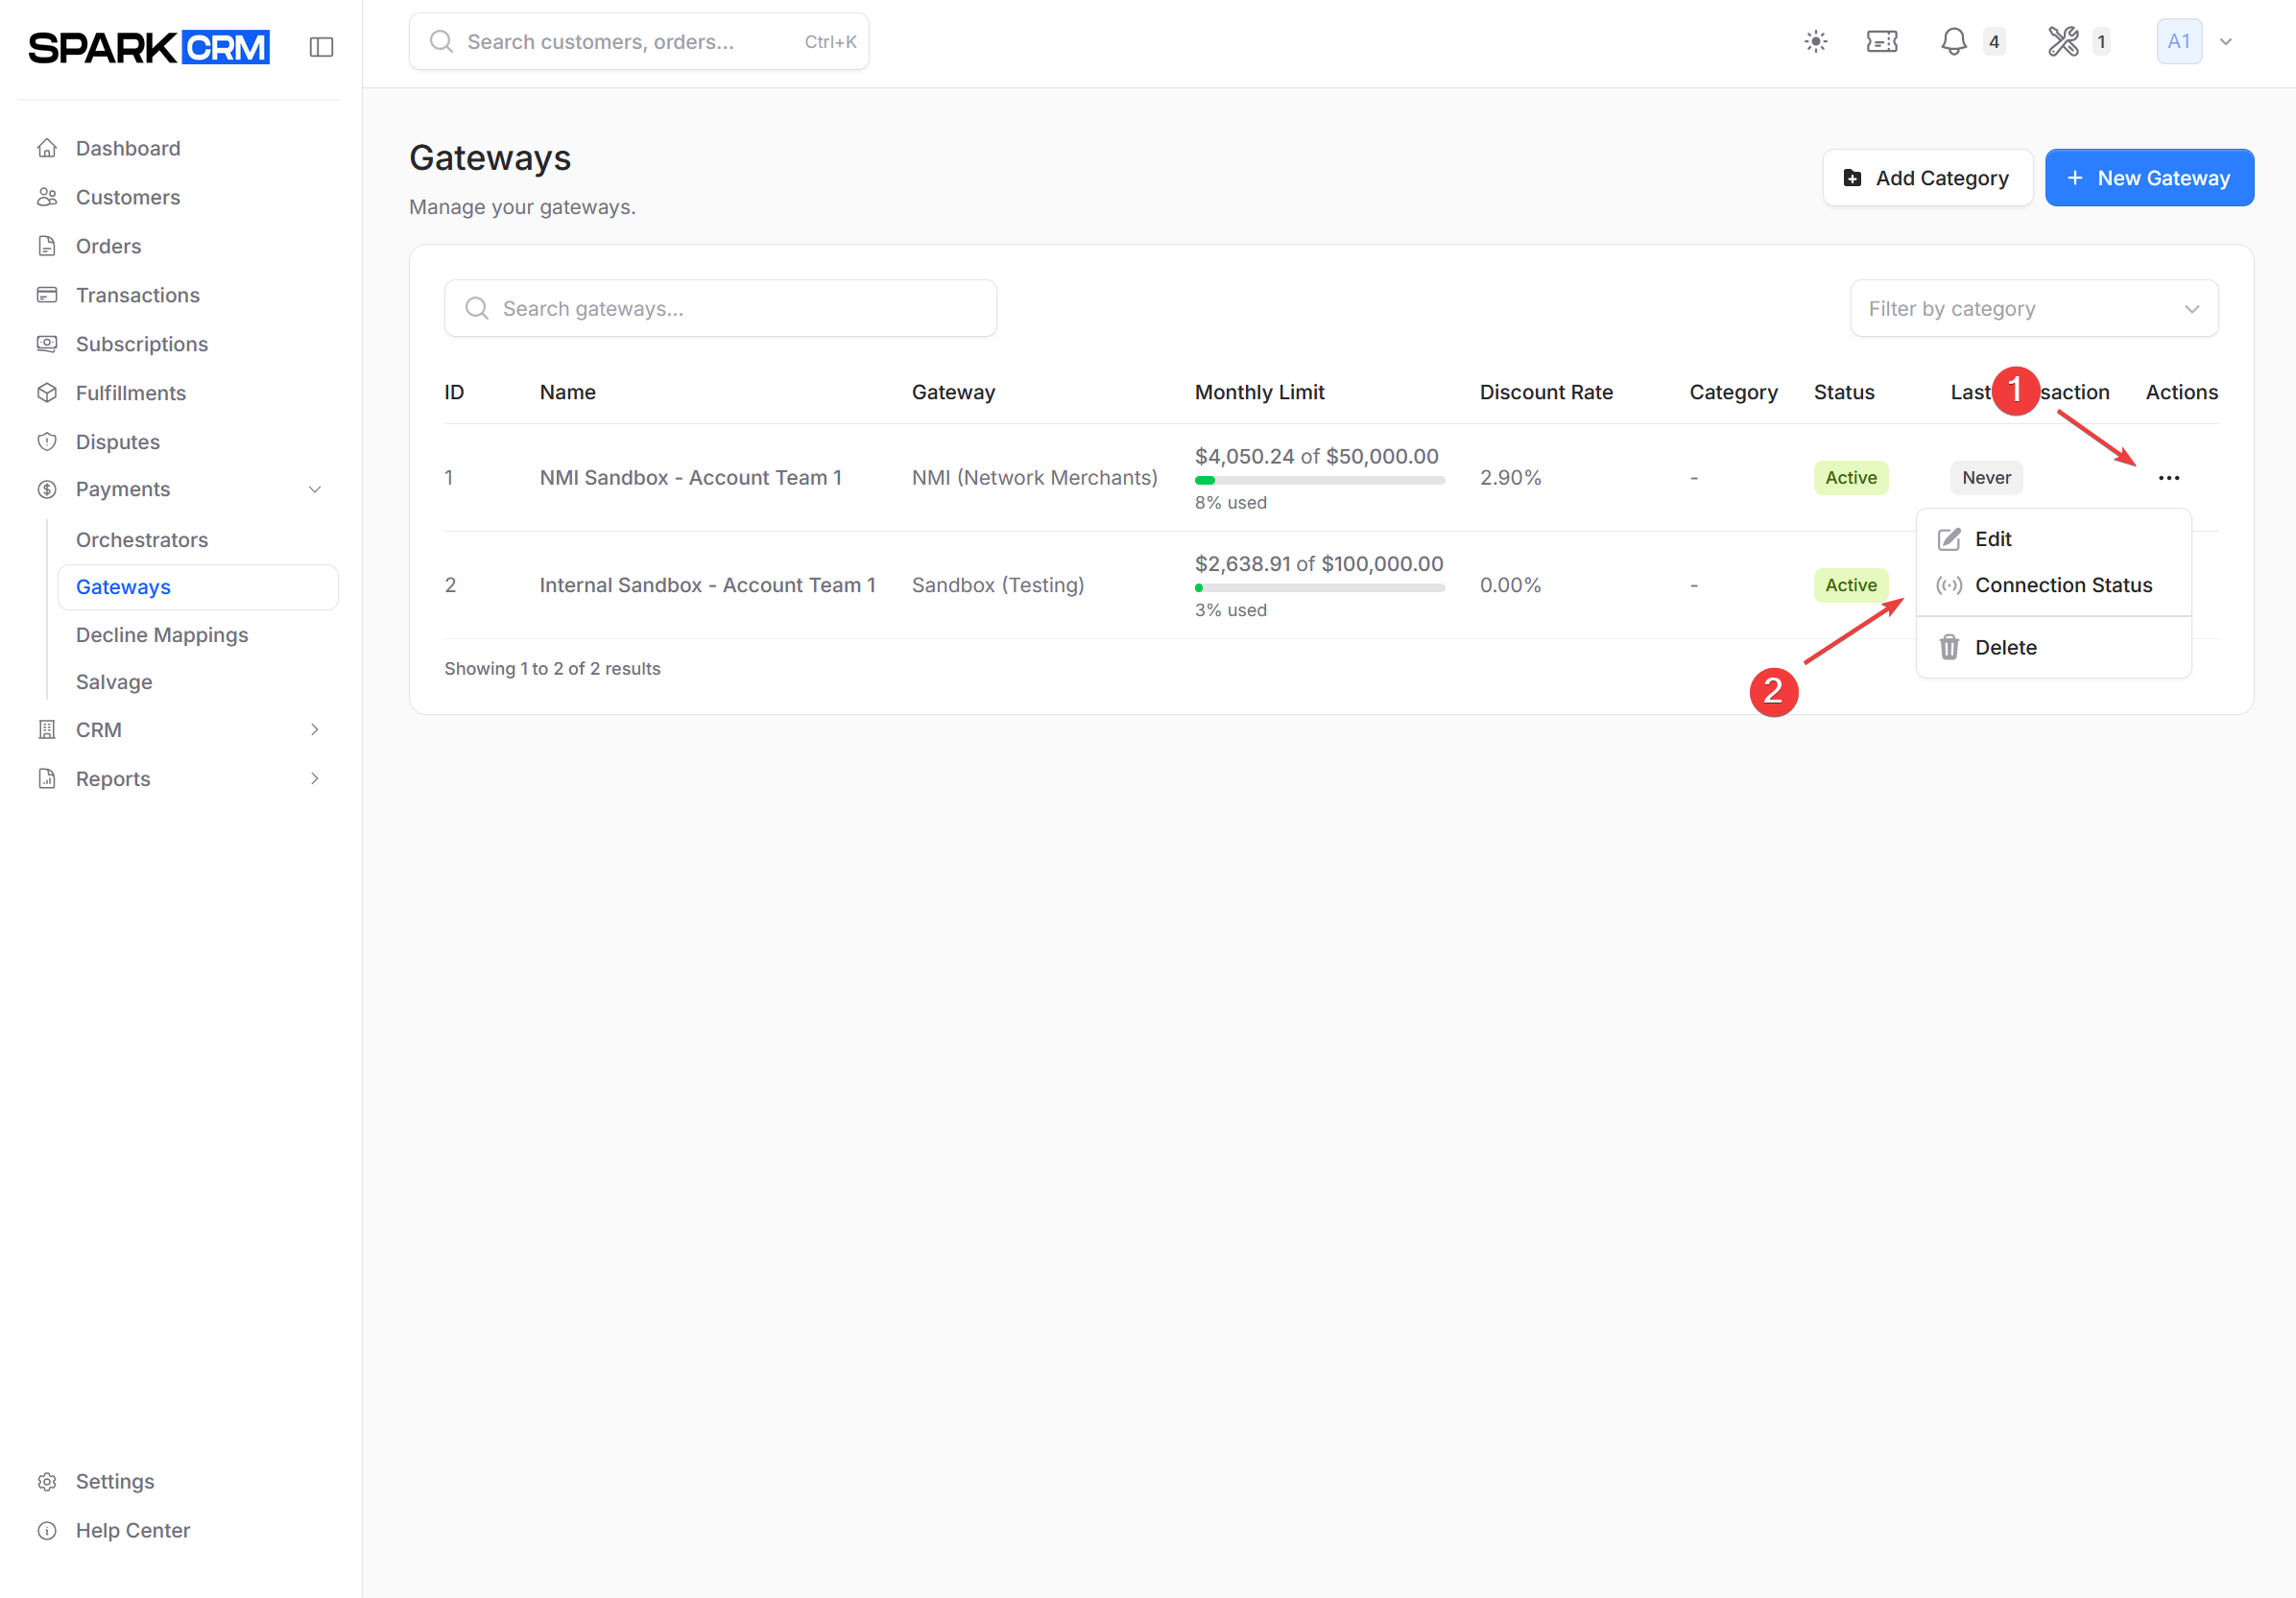
- After saving, find the gateway in the list, open the three-dot menu (…) > Connection Status, then click Test Now to verify the credentials
Managing Gateways
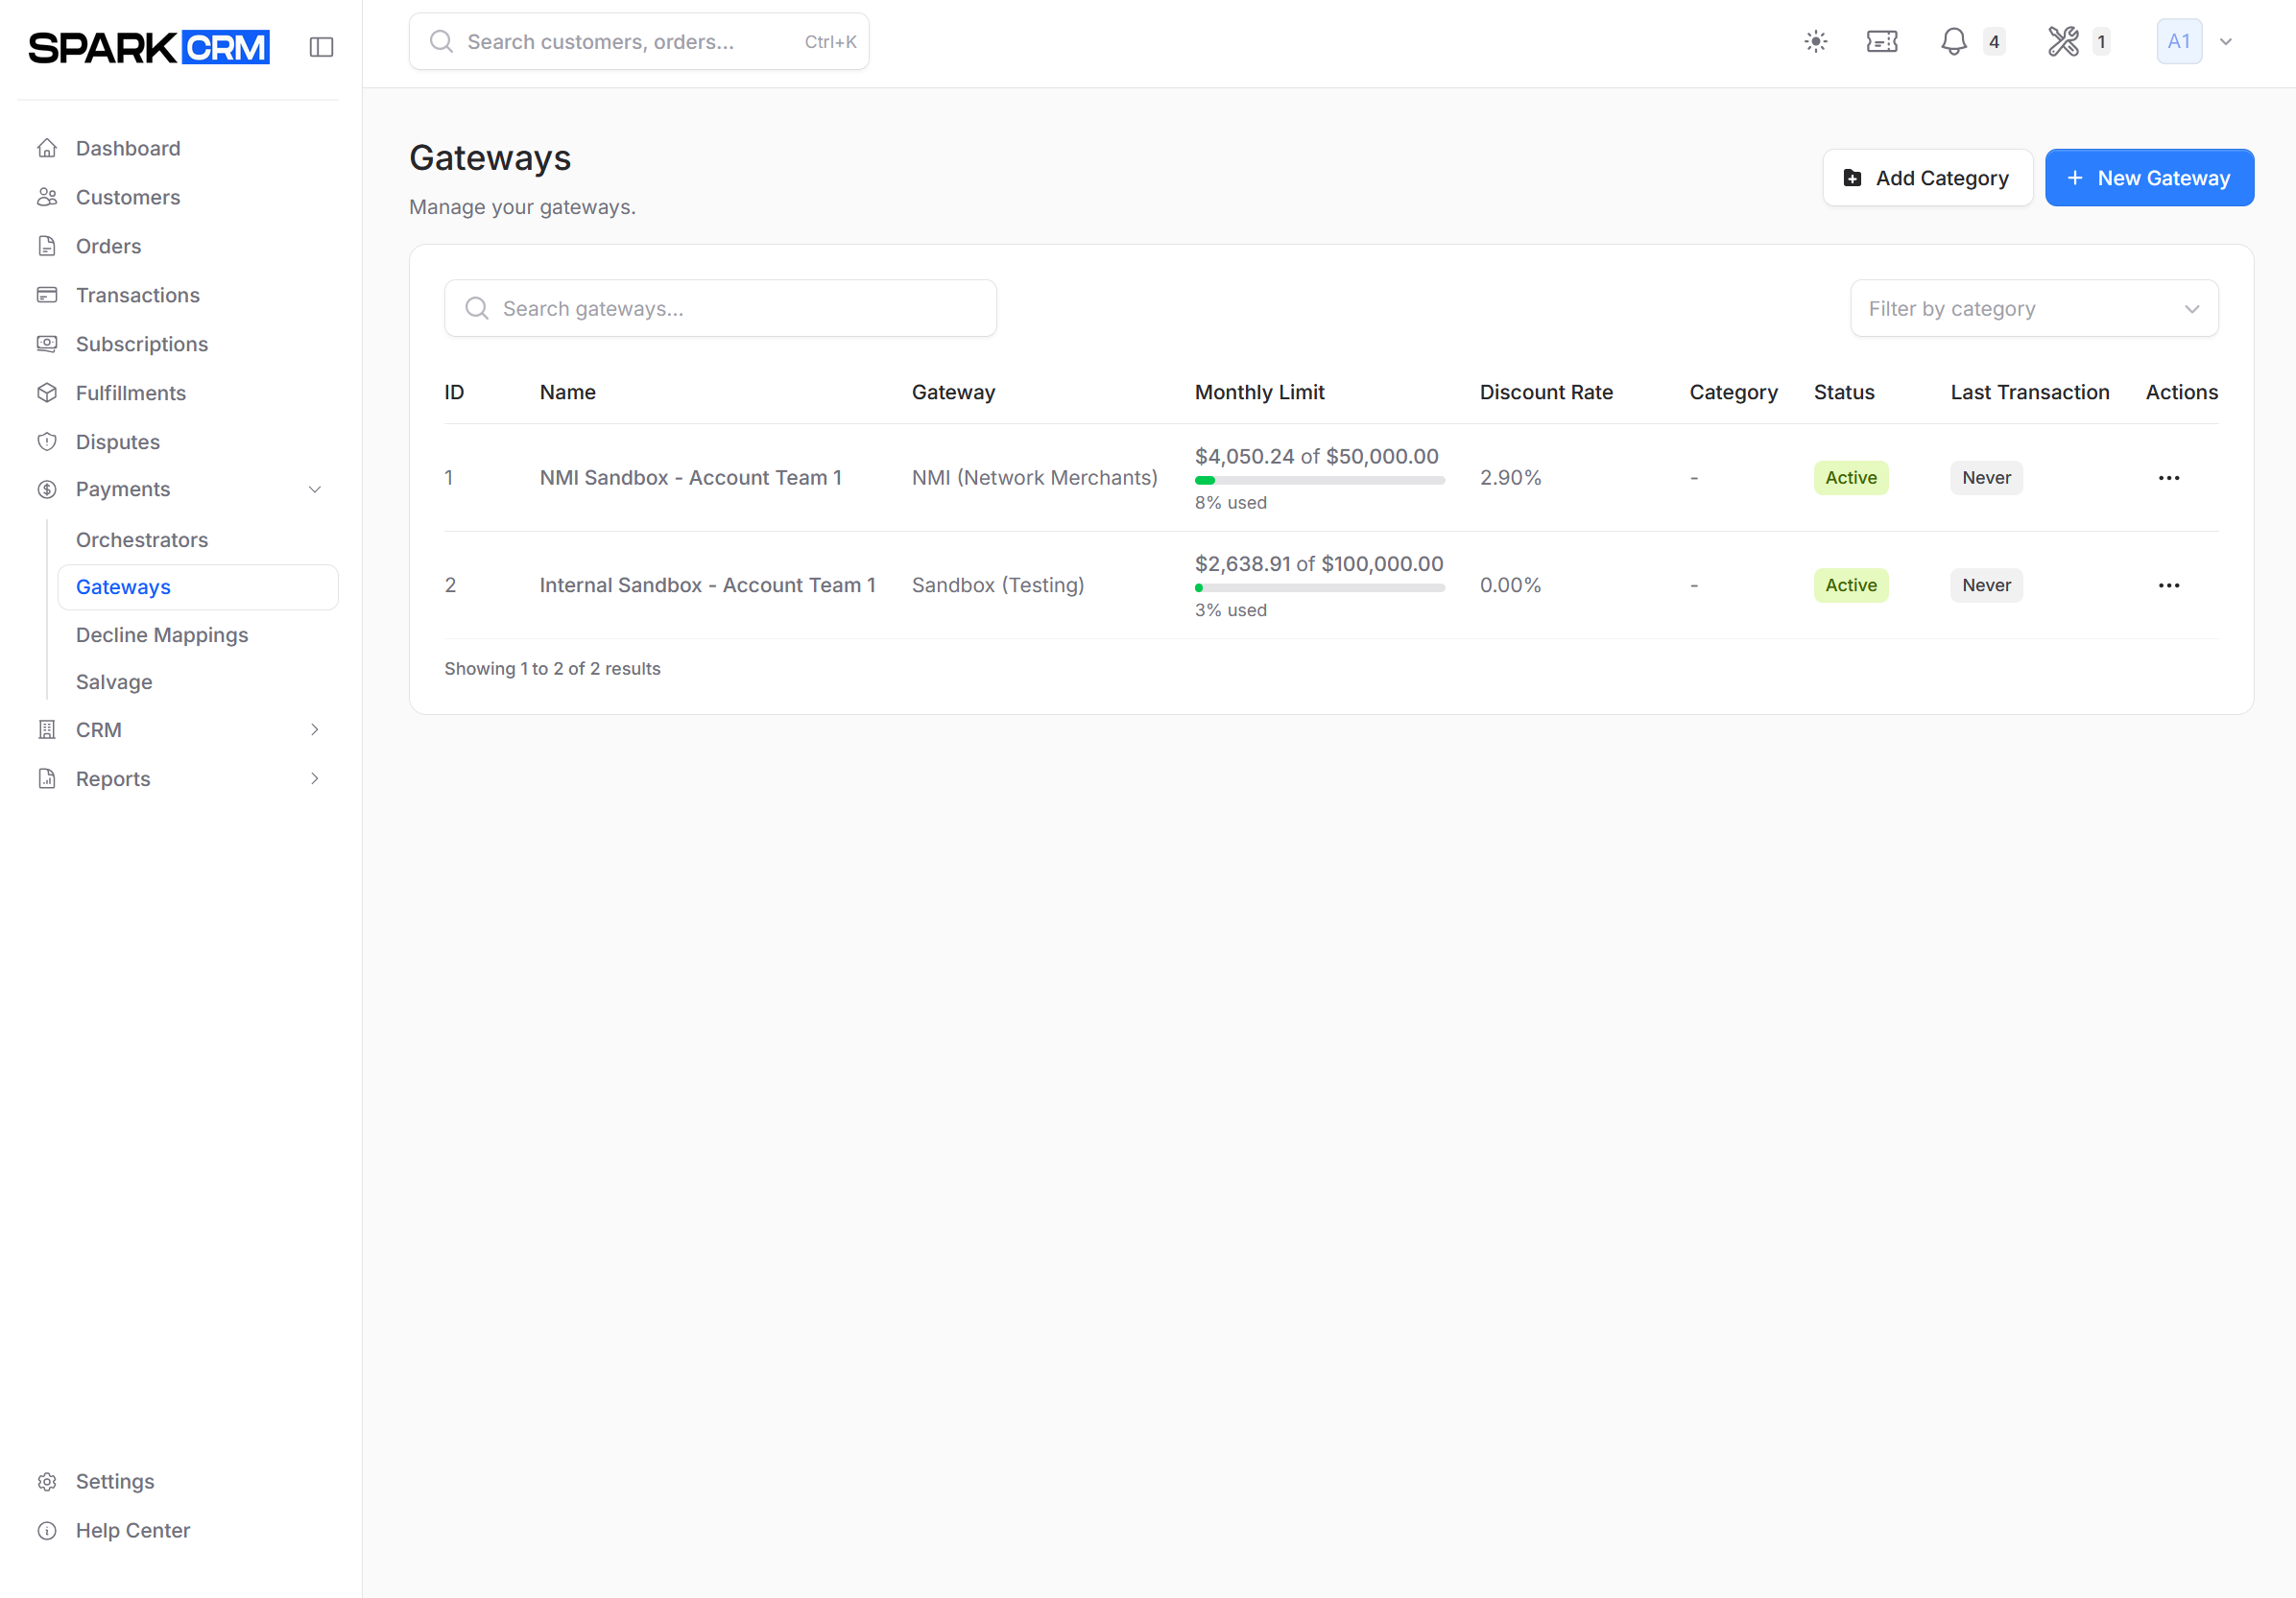
Gateway List View
The gateway list displays:
| Column | Description |
|---|---|
| ID | The gateway’s internal ID (default sort, newest first) |
| Name | Gateway display name — click it to edit |
| Gateway | Gateway processor type |
| Monthly Limit | Month-to-date approved volume against the monthly limit, with a progress bar; adds a second daily bar when a Daily Processing Limit is set, and shows the timezone the counters reset in. Displays a No Limit badge when neither limit is configured |
| Discount Rate | The gateway’s processing discount rate |
| Category | Optional grouping |
| Status | Active, Inactive, Pending Configuration, Connection Error or Suspended (only Active processes transactions) |
| Last Transaction | Most recent successful transaction |
| Actions | Three-dot menu (…): Edit, Connection Status, Duplicate, Delete |
Filtering and Searching
- Search: Filter by gateway name
- Category Filter: Filter by gateway category
Gateway Categories
Organize gateways into categories for easier management:
- On the Gateways page, click Add Category (or, while creating or editing a gateway, click New Category beside the Category field)
- Enter category name
- Click Create Category (or Create & Assign if you opened the modal from inside the gateway form). Category names must be at least 2 characters and unique within your team.
Assign gateways to categories when creating or editing them.
Testing Gateway Connections
Connection Test
Verify your gateway credentials work correctly:
- Locate the gateway in the list
- Click the three-dot menu (…)
- Select Connection Status
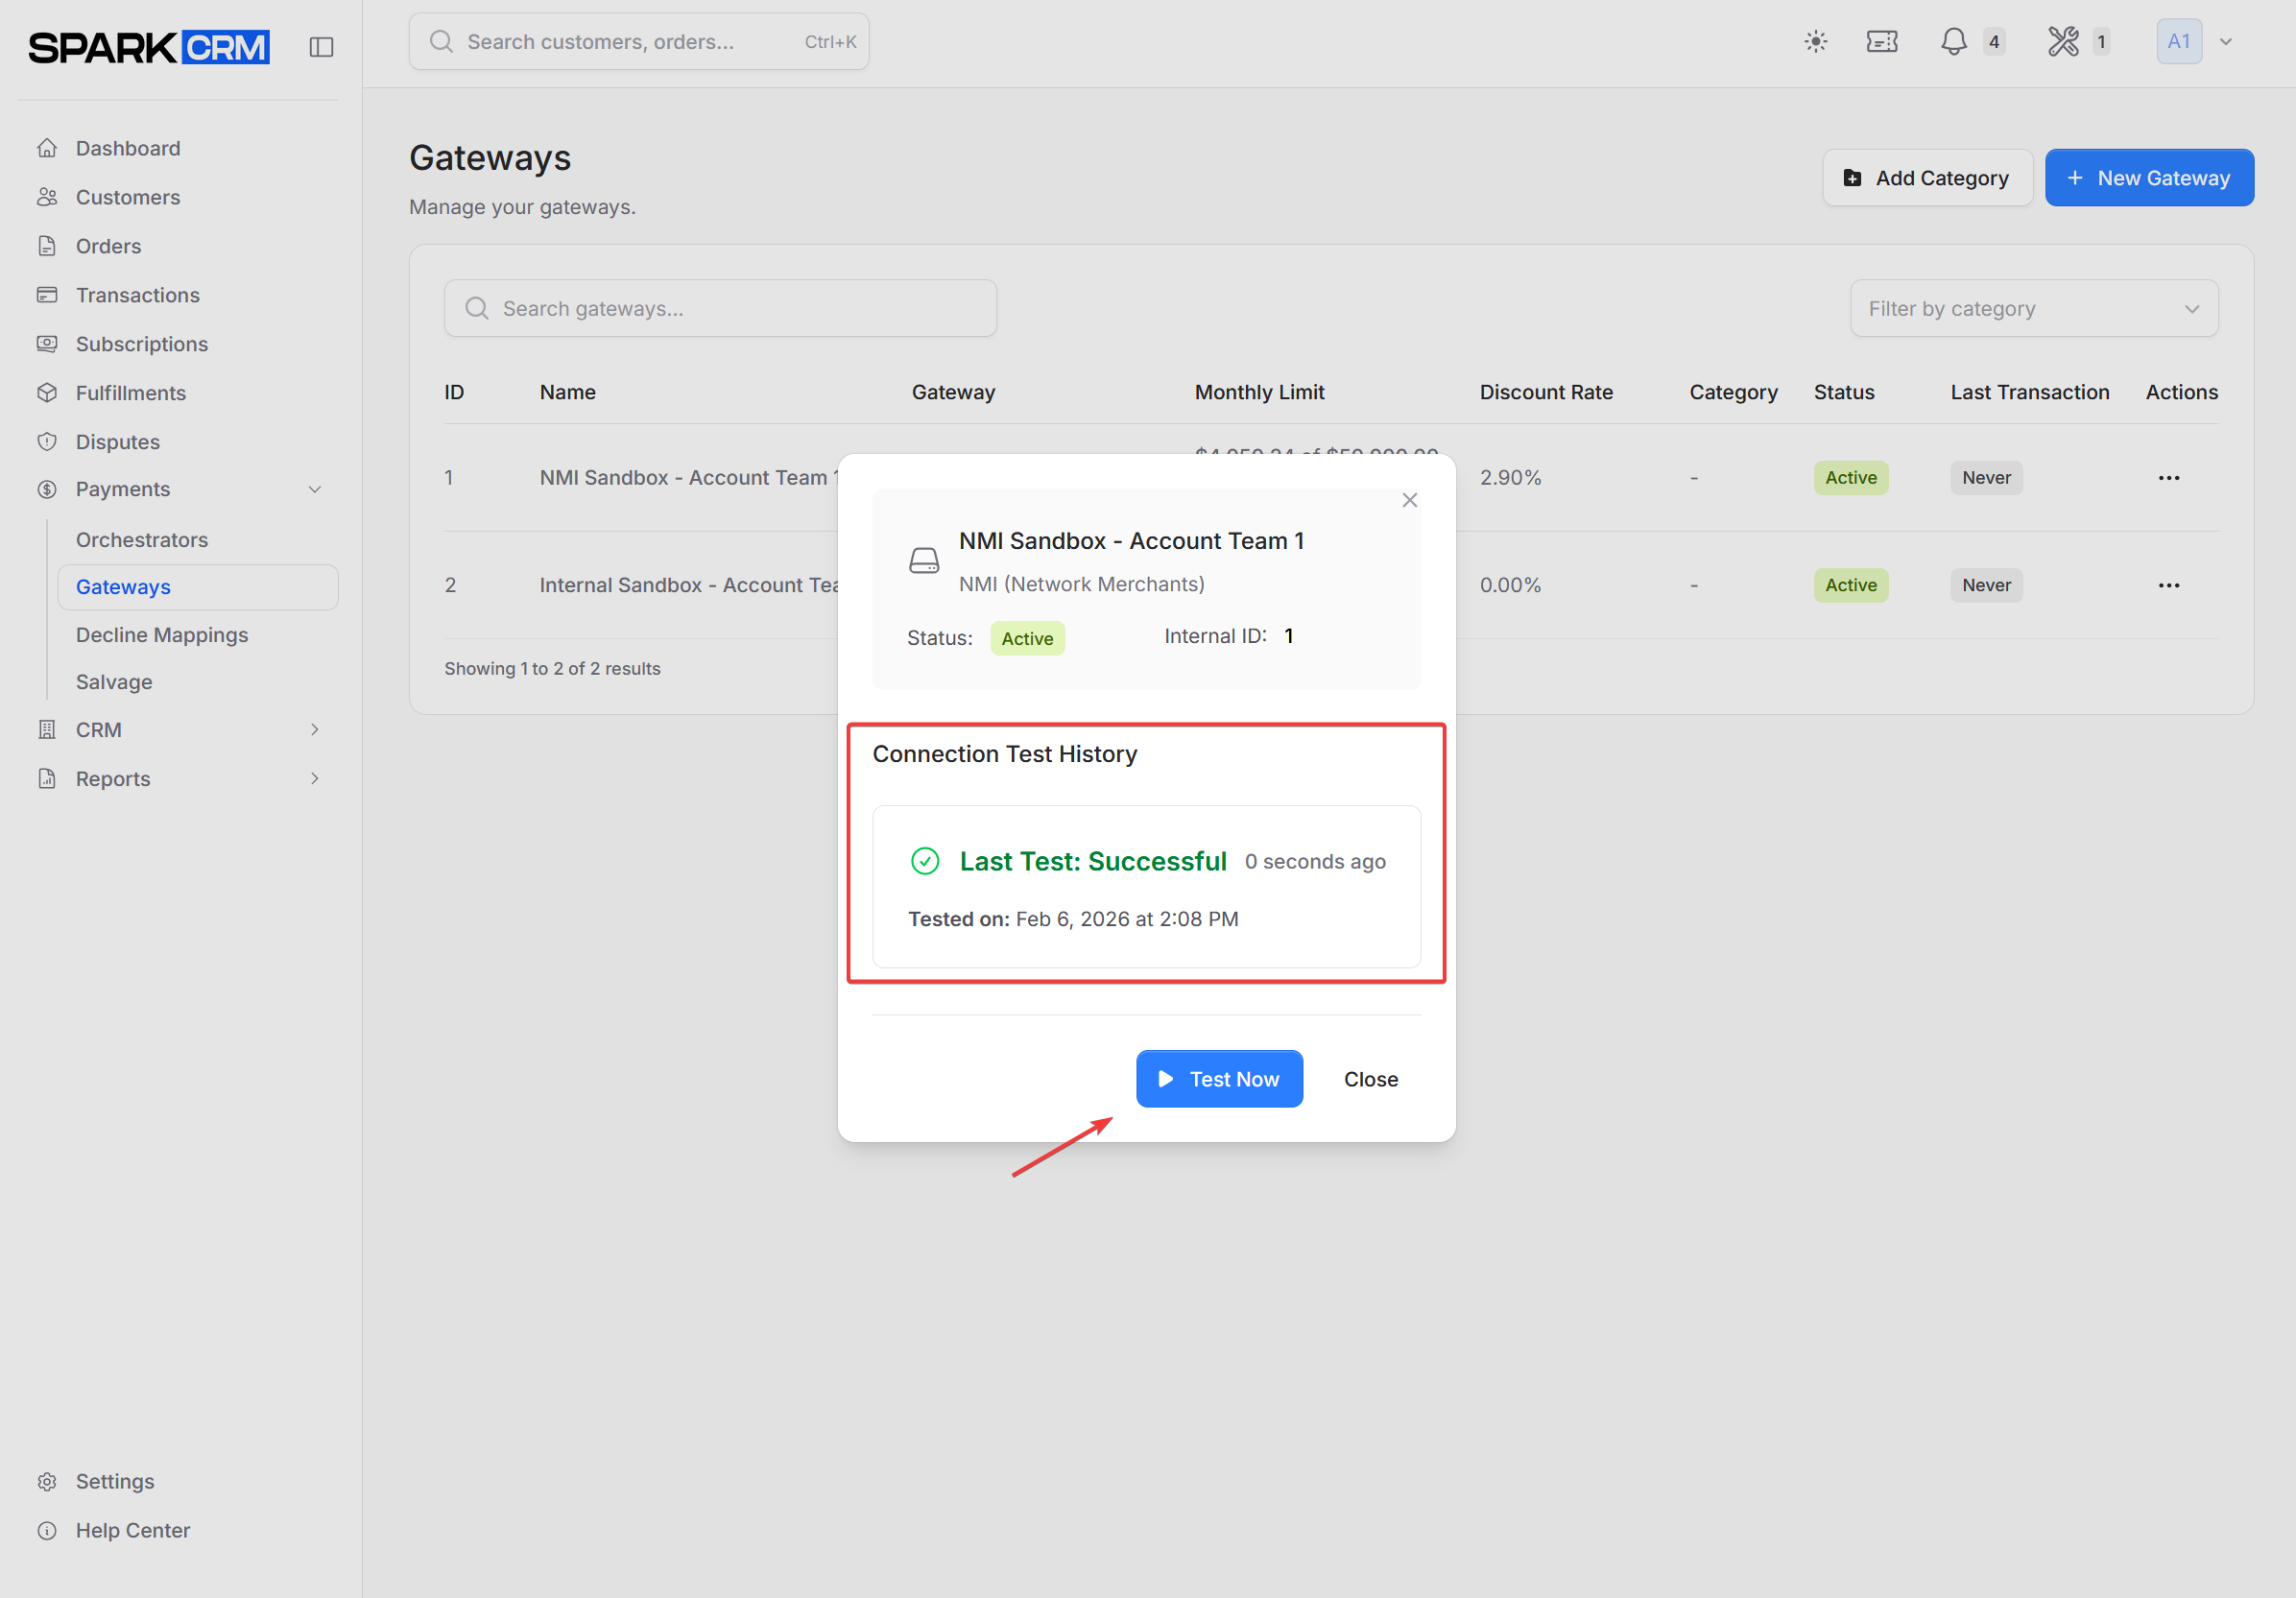
Successful Test:
- Green success message
last_connection_test_atupdated- Gateway ready for transactions
Failed Test:
- Red error message with details
- Check credentials and try again
- Verify IP allowlists on processor side
Connection Details Modal
View detailed connection information:
- View connection status and history
- Click Test Now to run a new test
Editing a Gateway
- Find the gateway in the list
- Click the three-dot menu (…)
- Select Edit
- Modify settings as needed
- Click Update Gateway
Note: Changing credentials requires retesting the connection.
Deleting a Gateway
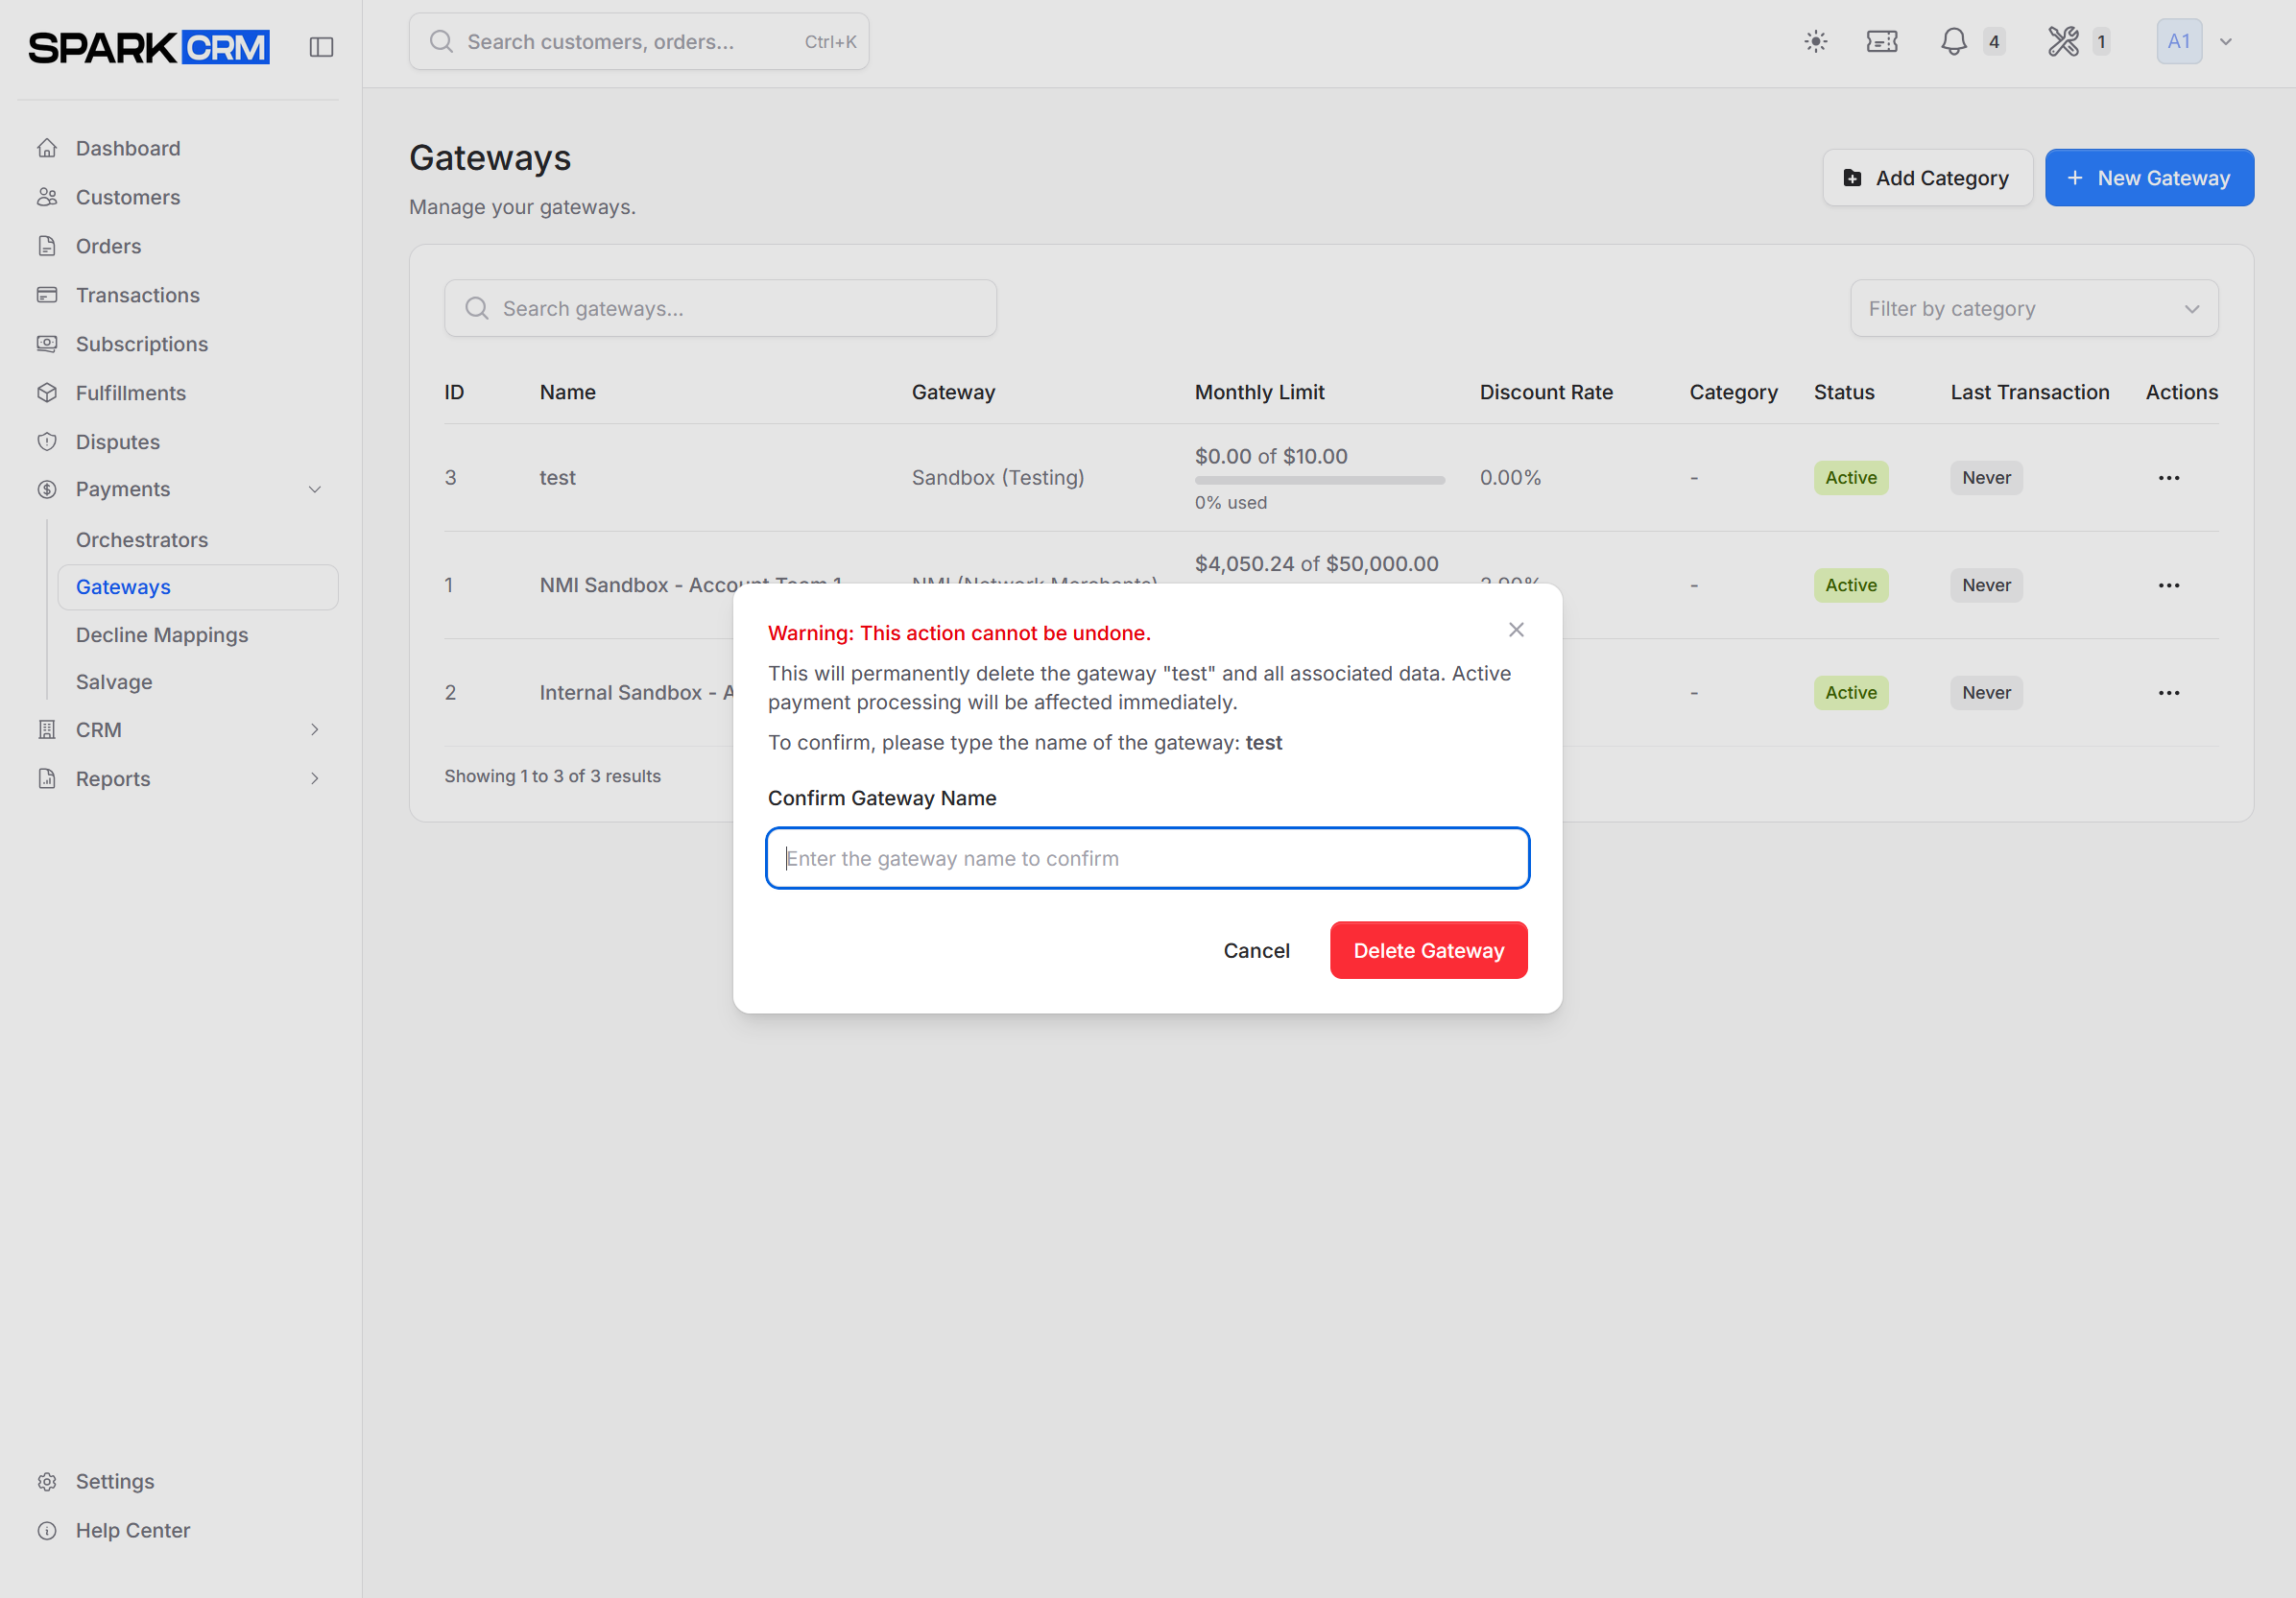
Warning: Deleting a gateway removes it from your list and stops it processing immediately. Ensure no active campaigns or orchestrators reference it. The record is archived rather than erased — creating a new gateway with the same name restores the archived record (keeping its internal ID and any payment-router attachments) and overwrites it with your new settings, so use a different name if you want a genuinely fresh gateway.
- Find the gateway in the list
- Click the three-dot menu (…)
- Select Delete
- Type the gateway name to confirm
- Click Delete Gateway
Gateway Status
These are the labels shown in the list’s Status column; the Status dropdown on the gateway form lists the same five as Active, Inactive, Pending, Error and Suspended.
| Status | Description |
|---|---|
| Active | The only status that processes. Available for new sales, rebills, salvage and cascade routing |
| Inactive | Disabled; not used for any new transactions |
| Pending Configuration | Not used for any new transactions. Gateways created through the API start here |
| Connection Error | Not used for any new transactions |
| Suspended | Not used for any new transactions |
Only Active gateways process. Setting any other status stops new charges, subscription rebills, decline salvage and cascade retries on that gateway immediately, without further warning.
Set a gateway to Inactive to temporarily disable it without deleting configuration.
Sandbox vs Production
Testing with Sandbox
For development and testing:
- Create a gateway with type Sandbox (Testing)
- Configure the mode (always approve, always decline, or random)
- Process test transactions
Test Card Numbers (Sandbox):
- Any valid card format will work
- Use
4111111111111111as a standard test number - Expiry: Any future date
- CVV: Any 3 digits
Going to Production
When ready for real transactions:
- Create a new gateway with production credentials
- Test the connection
- Update campaigns to use the production gateway
- Keep sandbox gateway for future testing
Important: Never delete your sandbox gateway - keep it for testing new features.
Best Practices
Gateway Naming
Use clear, descriptive names:
Production - Stripe USDNMI - High RiskSandbox - Testing
Multiple Gateways
Set up multiple gateways for:
- Redundancy: Backup if primary fails
- Optimization: Route by card type or region
- Testing: Separate sandbox from production
Monitoring
Regularly check:
- Connection test status
- Monthly processing vs limits
- Transaction success rates (via Payment Report)
Security
- Use unique credentials per gateway
- Rotate keys periodically
- Monitor for unauthorized access
Troubleshooting
Connection Test Fails
Check:
- Credentials are correct
- Gateway account is active
- IP allowlist includes Spark CRM servers
- Sandbox vs production mode matches credentials
Transactions Declined
Check:
- Gateway status is Active
- Card brand is in accepted list
- Currency is supported
- The gateway’s Daily Processing Limit has not been reached, and the gateway’s monthly cap on the payment orchestrator has not been reached. (The gateway’s own Monthly Processing Limit is for tracking and capacity alerts only — it never blocks a charge.)
Gateway Not Appearing
Check:
- Gateway was saved successfully
- You’re viewing the correct team
- Search/filters are cleared
Related Topics
- Payment Orchestrators - Route transactions across multiple gateways
- Cascade Profiles - Retry declines on backup gateways immediately
- Decline Mappings - Standardize decline codes
- Decline Salvage - Recover failed transactions